Menu

Jun
30
Shot of the Month – June 2022
The natural world is filled with stunning beauty. I am certainly drawn to it and spend much of my free time trying to capture it with my camera. However, surviving in the wild is not for the faint of heart as life in the food chain is an endless battle between predator and prey. Many of us are attracted to the predator as we admire their cunning and specialized skills. Others root for the prey, especially if said prey is cute and cuddly.
In this post, I will share images where the predator was successful. This post will not be for everyone – if you are squeamish and don’t like to witness this harsh reality, I suggest you skip this month’s images.
In 2021 I went on a safari to Kenya that was focused specifically on the big cats. We would spend hours searching for lions, leopards, or cheetahs with hopes of witnessing those epic life-and-death struggles. The trip was so “successful” on that front that by the end we were quite traumatized by the amount of death we witnessed. We definitely experienced PTSD – Post Traumatic Safari Disorder. During a 10-day period, we saw a life-and-death struggle almost every day and sometimes several times a day.
Cheetah Mother and Cubs
")
We spent many hours over several days with this cheetah mother and her three cubs. The female was absolutely stunning looking and was by far the most impressive cheetah I have ever seen. Cheetahs are often timid and skittish. Not this female. She was powerfully built and walked with a confidence and swagger, unlike anything I have ever seen with a cheetah. Every day she had to find a meal for her growing cubs and we saw her hunt several times. In the image above mom caught a young impala but she did not kill it. Rather, she called her cubs over to have them learn/practice how to suffocate their prey. It was a tough scene to watch as the cubs didn’t know how to effectively apply the neck bite and the death was slow and drawn out. While it was a sad end for the impala, the cheetah mom had again provided essential food for her family and taught her cubs important life skills that they will need if they are going to survive on their own.
Piglets
One morning we drove to a location where we heard that two cheetahs had been spotted. As we approached we saw a couple of other vehicles sitting nearby. We had no idea where the cats were but we surmised that the cats must be sitting or lying in the tall grass in front of us. We stopped the vehicle and prepared ourselves for a long wait. But only five minutes later…
“Holy Crap!!” A warthog mom and her two piglets appeared out of nowhere and trotted down the path towards us not realizing the danger that lurked nearby.
")
After a brief stop, the warthog family continued down the road. The two cheetahs exploded from the grass. Mom warthog bolted straight ahead while the piglets ran in the opposite direction. The two cheetahs began chasing Mom but after a few yards, they stopped. The cats realized that the easier meal was behind them. The cheetahs changed direction and moments later each had caught a piglet.
In the blink of an eye, the mother warthog lost her entire family. In this image, we see the two cheetahs fighting over one of the piglets:
")
Young Topi and Young Lion
Near the end of a long day, we found a pride of lions stalking a herd of Topi that was about 100 yards in front of our vehicle, a bit off to the right.
")
While waiting I looked behind our vehicle and saw an adult Topi that seemed to be bleeding. I looked through the binoculars and saw blood on her rump. I said, “Hey look, that adult must have been attacked by a lion but managed to escape with those fresh wounds.” My partner took the binoculars and said, “No, she just gave birth, the newborn is lying just nearby. That blood is the afterbirth.” What a wonderful surprise.
Our joy was short-lived.
In the next moment, a young lion cub appeared and ran over and grabbed the newborn calf – most likely his first kill as a very young lion. The young calf’s “circle of life” was complete in just a few minutes and this emotional roller coaster left us reeling as we careened from joy to horror in seconds.
")
It was quite dark when I shot this image so the shutter speed was quite slow – the motion blur helps soften this Shakespearean tragedy – a bit. This was a particularly traumatic day – our day started with the warthog piglets and ended with the topi calf.
But the day had one last surprise. While watching the young lion run off with the topi calf we heard a commotion back out in front of our vehicle. We drove over and found that the stalking lion had just captured an adult topi.
")
A very tough day for the topi herd.
But don’t let these selected stories mislead you – we saw multiple other encounters where the prey won the day. Life is a struggle for all wildlife, predator and prey alike. In reality, the vast majority of predator hunts end in failure. Likewise, most young lions, leopards, and cheetah cubs never make it to adulthood.
I admire the beauty in both sides of the struggle. And I take solace that with each life lost, the “sacrifice” allows others to survive and keep the ecosystem in balance.
Ok, I promise, next month, definitely something cute and cuddly…
Cheetah Mom with Cubs (Nikon D4S, Nikon 200-400mm, f/5, 1/4000s, ISO 720
May
31
Shot of the Month – May 2022
")
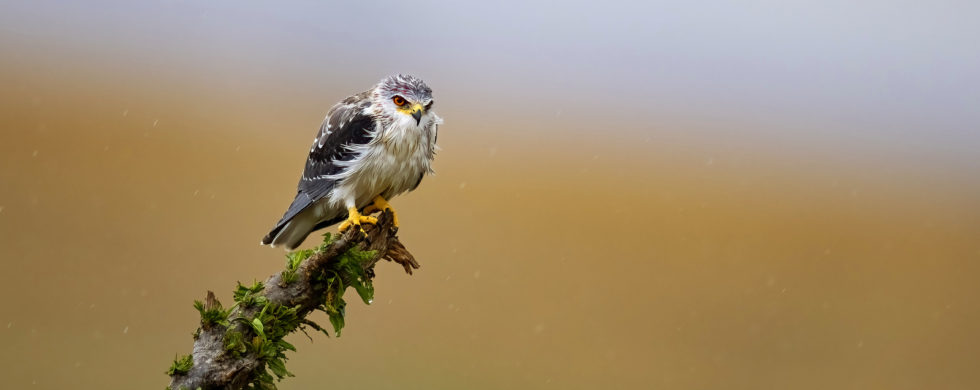
This month I share an image of a lovely Black-shouldered Kite (BSK). I photographed this beauty during a downpour in Masai Mara NP in Kenya (if you look closely you can see the rain coming down). The BSK gets its name from the dark shoulder patches on its wings and it is the contrast of those dark wings against the white underbelly that first caught my eye. But as I looked more closely at this bird hunkered down in the rain, I noticed that the head and back are draped in exquisitely blended gradients of gray. To add a bit more flair the BSK has striking yellow feet, a yellow beak, and dramatic red eyes.
Yes, I am smitten with this little raptor.
So let’s get our terminology in order. A bird of prey is called a raptor. A raptor is a bird that mainly uses its claws (talons) to seize prey. But what makes a Kite a Kite?
For you science types, Kites are birds found in three subfamilies (Milvinae, Elaninae, and Perninae) of the family Accipitridae. There are about 25 species of Kites found around the world. Y-e-e-e-aaaah, that’s not super helpful – got anything else?
Here’s what I could find:
- Kites, as a group tend to have weak legs so they like to spend most of their time in the air. In flight, kites often flap their wings once and glide for long distances before flapping their wings again. While gliding, the wings are tucked behind the bird to create minimal air resistance so the bird seems to float through the air.
- Kites typically have long, narrow wings and tails.
- Kites often have forked tails. (The BSK has a square tail, so there are exceptions)
- Kites have small heads and short beaks. The face of many kites is partly bare as many of them feed on carrion and the bare flesh makes cleanup easier.
The BSK prefers open land and semi-deserts in Sub-Saharan Africa and tropical Asia, and for some reason, they can also be found in Spain and Portugal.
This small raptor tends to dine on rodents, grasshoppers, crickets, lizards, and sometimes on injured birds, small snakes, and frogs. The BSK is about 12-15 inches (30-36 cm) in length, with a 30-36 inch (76-91 cm) wingspan, and only weighs about 7-12 ounces (200-350 grams).
When hunting the BSK sometimes hovers over a field looking for prey (similar to what kingfishers do over water). Other times the bird will fly slowly, close to the ground in search of a meal. And yet other times the BSK will sit on a perch scanning the ground for prey – once spotted the bird will dive down to scoop up the unsuspecting victim.
As for the photo, as mentioned earlier, I love the look of this gorgeous raptor. I shot with a wide-open aperture to cause the background to disappear into a quiet blur and allow the bird to really pop out of the image.
In the image above I zoomed in to create a nice portrait of just one BSK. Actually, there were three birds sitting on a dead tree as they waited out the rain together (our portrait guy is on the right):
")
The two birds on the left are flapping their wings to shake the rain off.
While in Kenya we spent most of our time focused on finding the big cats – lions, leopards, and cheetah. And boy oh boy, we found a bunch of them. We had amazing sightings of said cats every day. And despite all that I have to say that sitting with this wee raptor, as the rain gently plopped, plopped, plopped on the canvas roof of our land cruiser, is still one of my favorite memories from the entire trip. I had never seen a BSK up close before (via my powerful lens) and it was a wonderful revelation.
Until next month….michael
Here is a fun video of a Black-shouldered Kite hovering (watch how the head barely moves!)
Sources:
All Things Nature (What is the Bird called a Kite?)
Nikon D500, Nikon 600mm, f/4, 1/1000 sec, ISO 1100, EV +1.0
Apr
30
Shot of the Month – April 2022
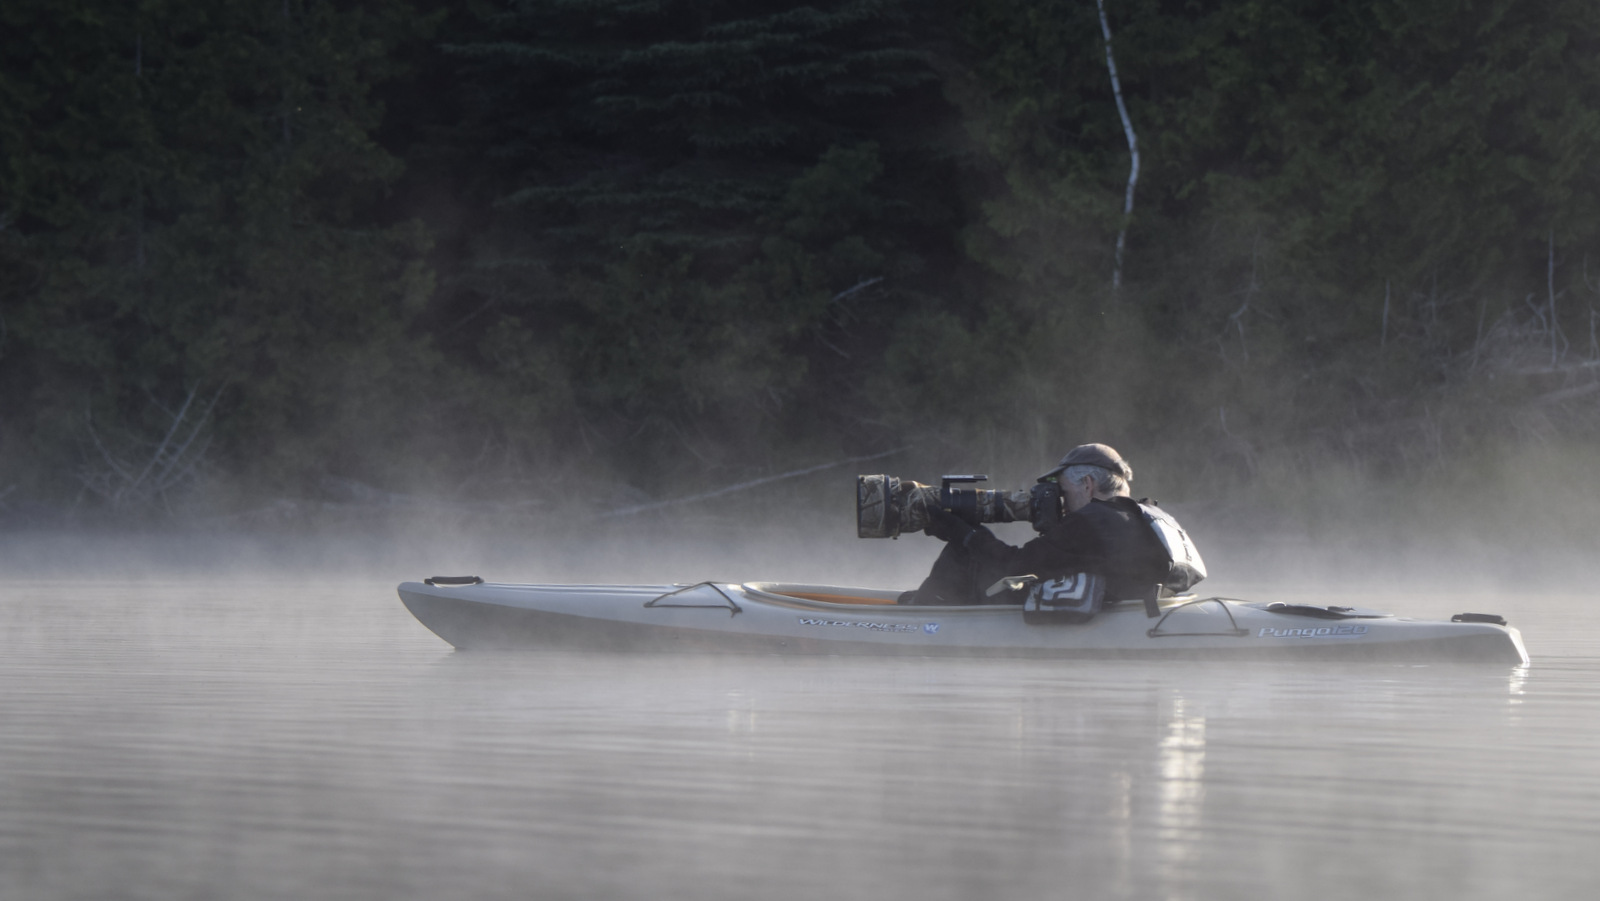
While living in Vermont I spent many a summer weekend morning in my kayak searching for Atlantic Loons. This meant getting out of bed very early and driving for 1 to 2 hours in the dark to one of several nearby lakes to ensure that my kayak hit the water before sunrise. If it all worked out well I would be able to photograph the loons in the golden light just after sunrise. Occasionally, it all came together:
Click here for the backstory on the image above.
One day I reached the lake early and began paddling out into the fog to look for loons. As the rising sun started to burn off the fog I could finally make out a loon in the distance. I saw that the bird was swimming to the farthest bank.
Oh no!!
I knew that this meant that he was planning to fly off to another lake. He was “taxiing” to the far bank to get enough space for take off. Loons are heavy birds and need a long “runway” to build up the speed for flight. Check out my post Looner Flight – No Small Feat for more on the wonders of the Atlantic Loon (aka Common Loon).
I started paddling furiously. I was looking directly into the sun and I wanted to get to the other side of the loon before he took off so I could photograph him with the sun behind me so the bird would be front-lit.
Too late!
The loon started to flap his wings and began his sprint. I put my paddle down, grabbed my camera, and held down the shutter button.
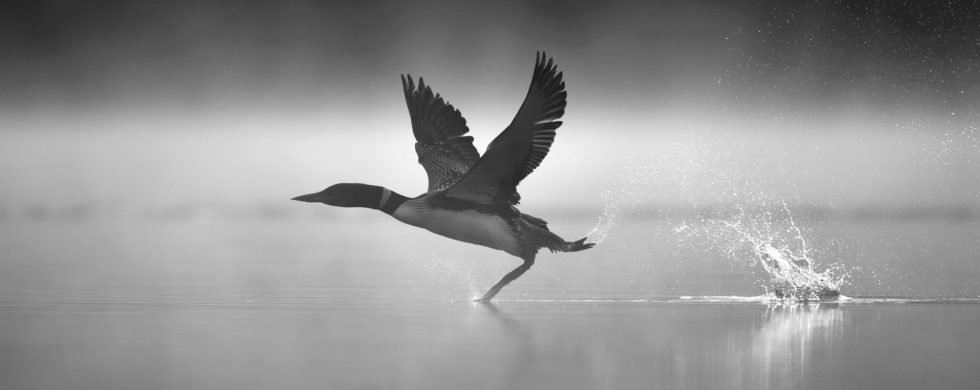
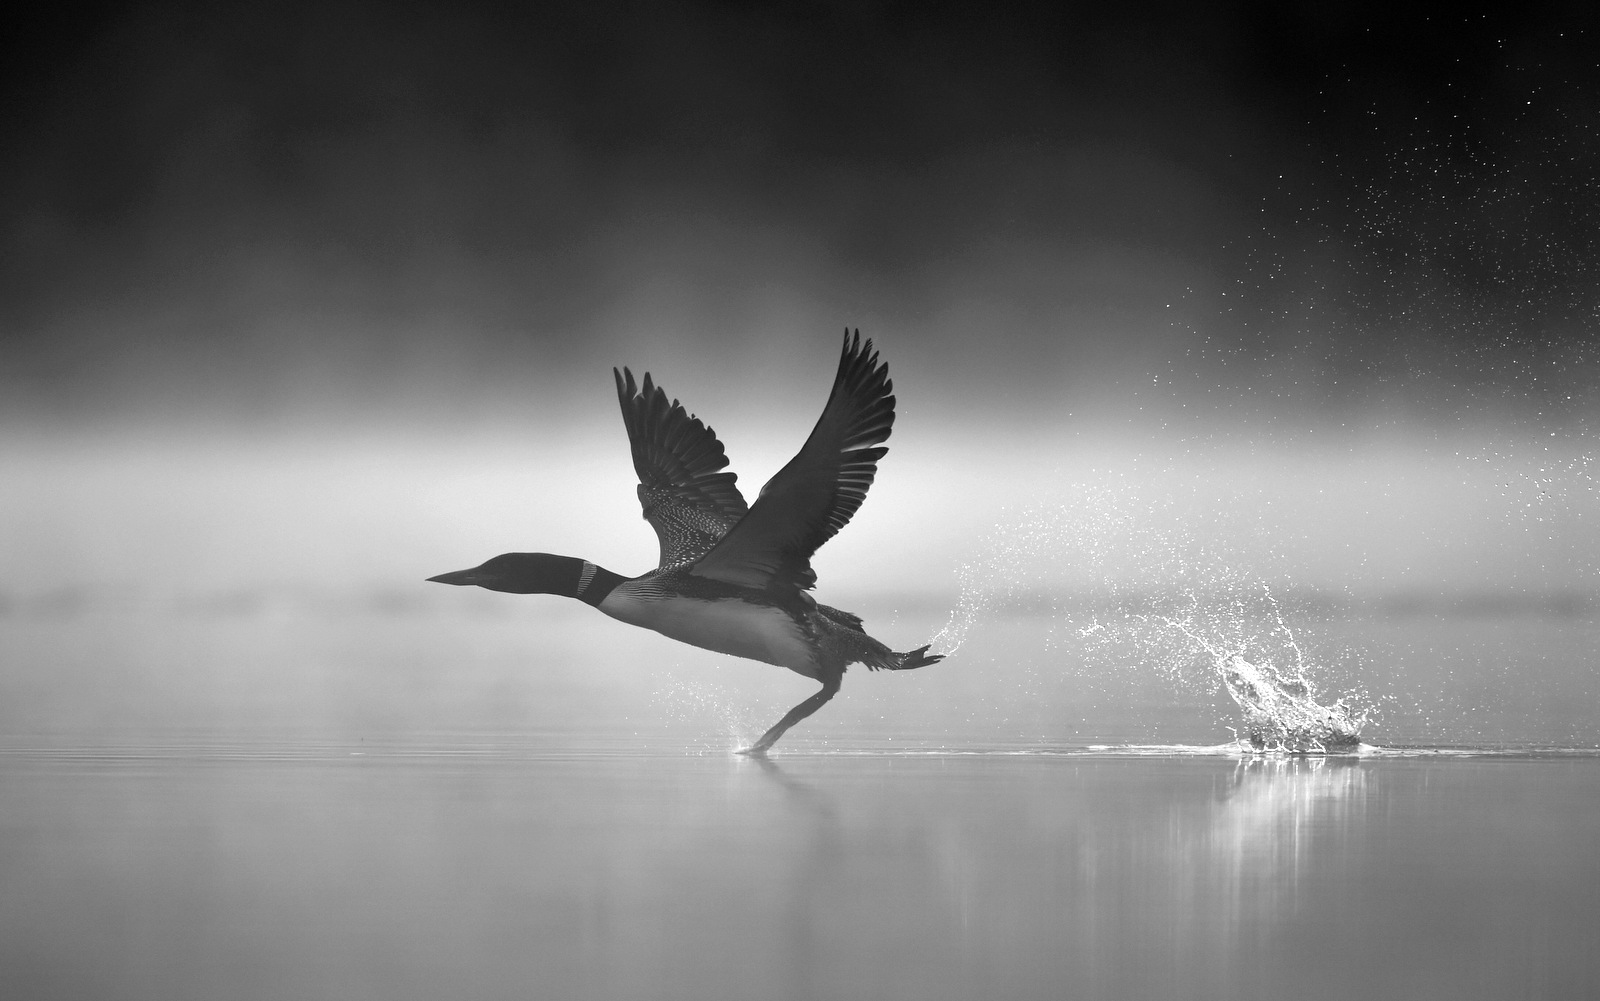
With the sun behind my subject, I wasn’t able to capture the rich colors I hoped for but the striking image below is an example of the magic that can happen when the subject is backlit. In this case, the sun was behind the loon and produced wonderful highlights in the water as the bird skipped across the surface. I love how his one foot is just kissing the surface of the water.
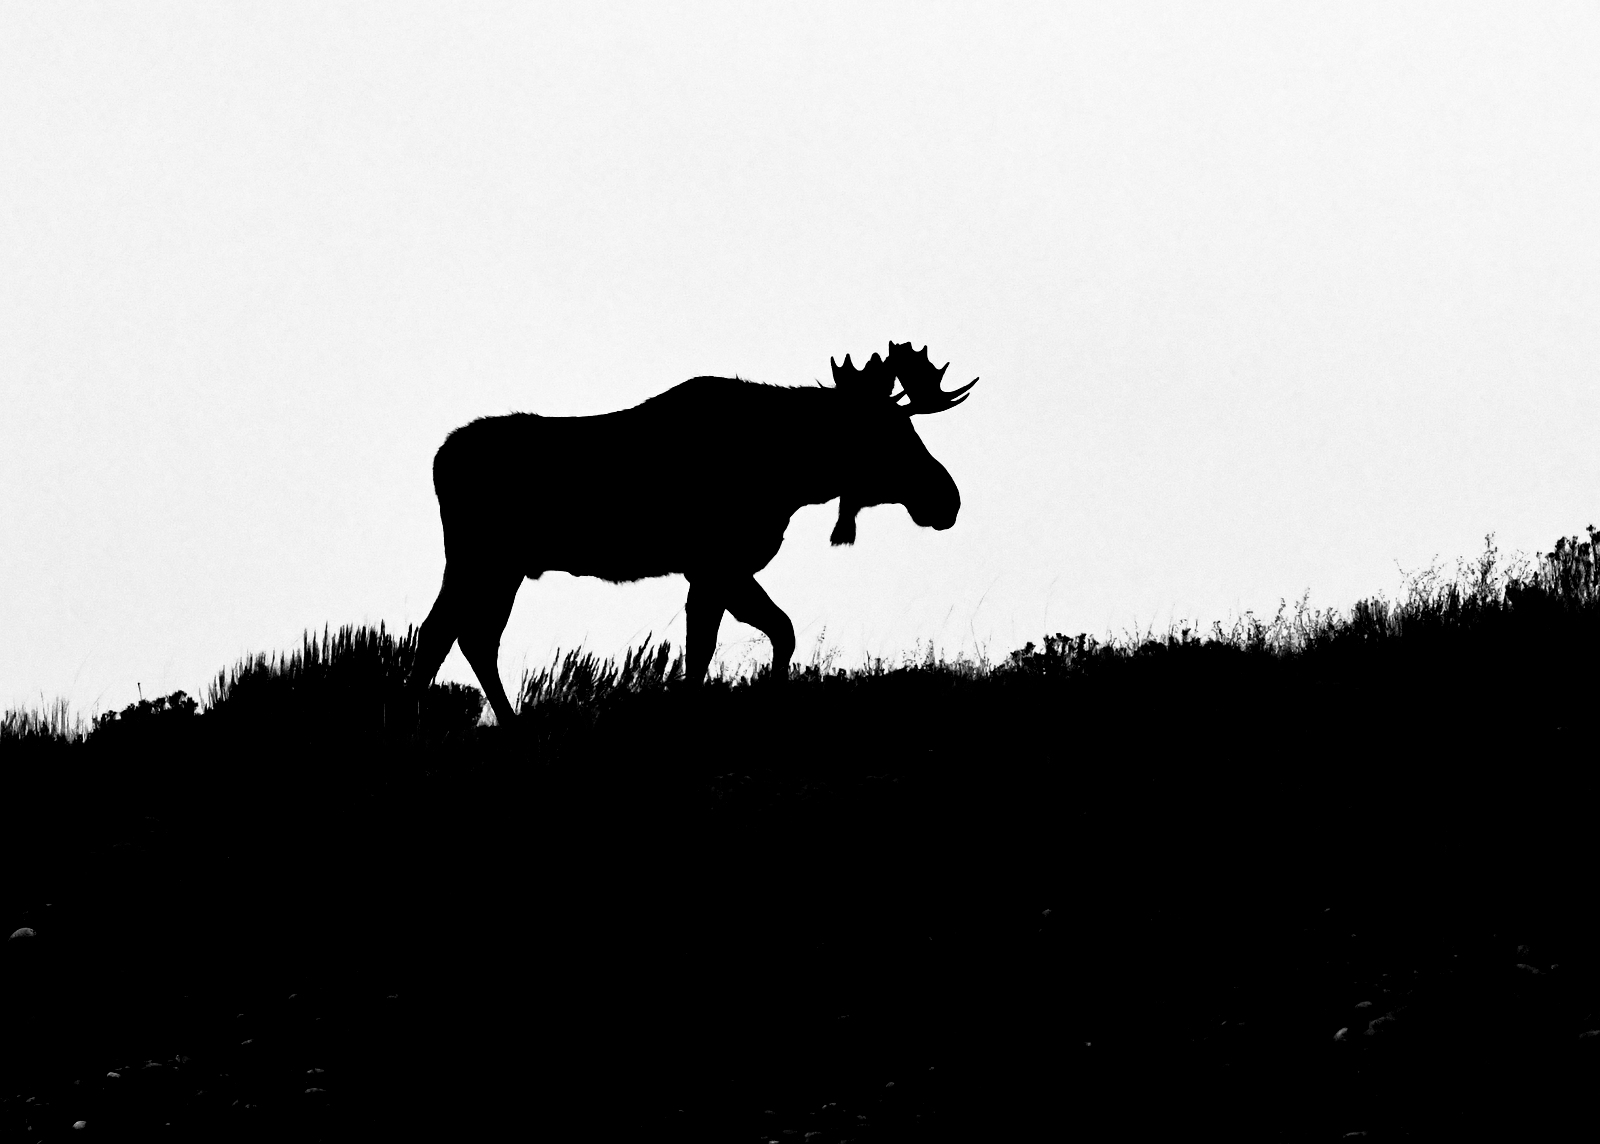
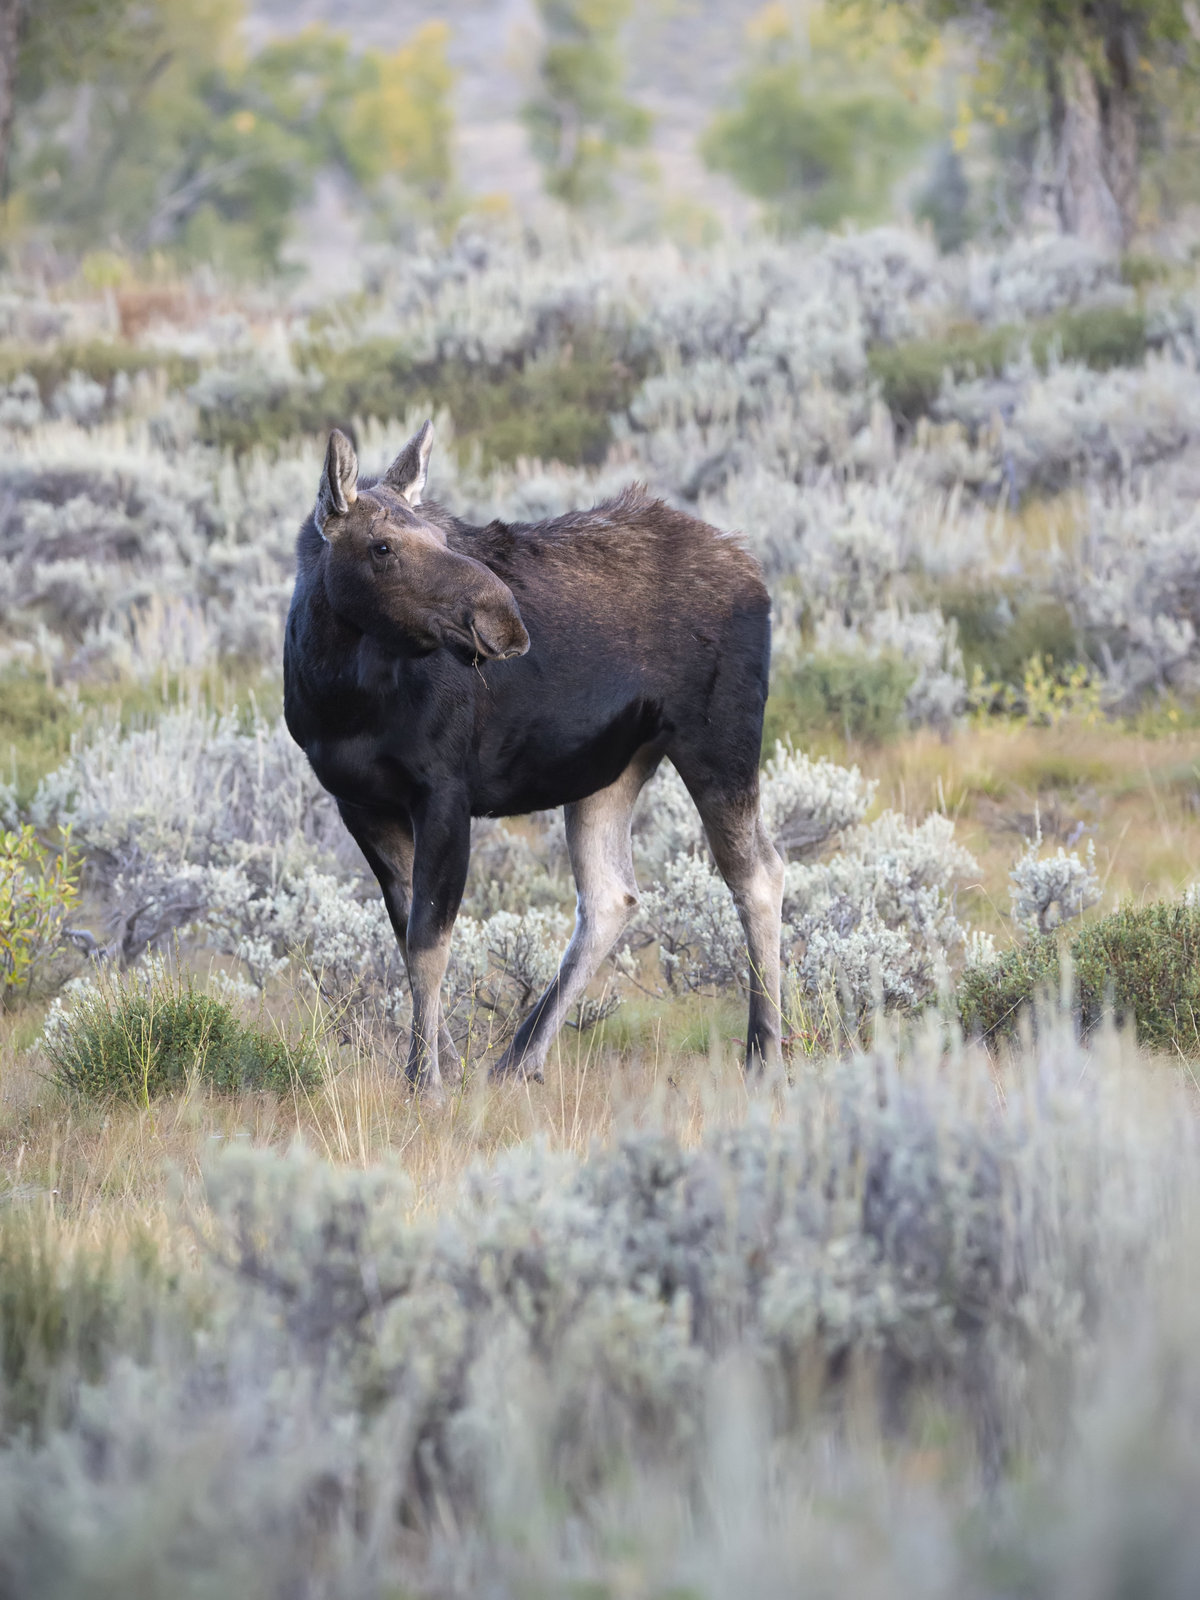
Backlighting allows us to highlight the shape of an animal or explore dramatic light and shadows in a scene. The lighting in the image below allows us to easily make out a moose walking along a ridge line in the Grand Teton NP.
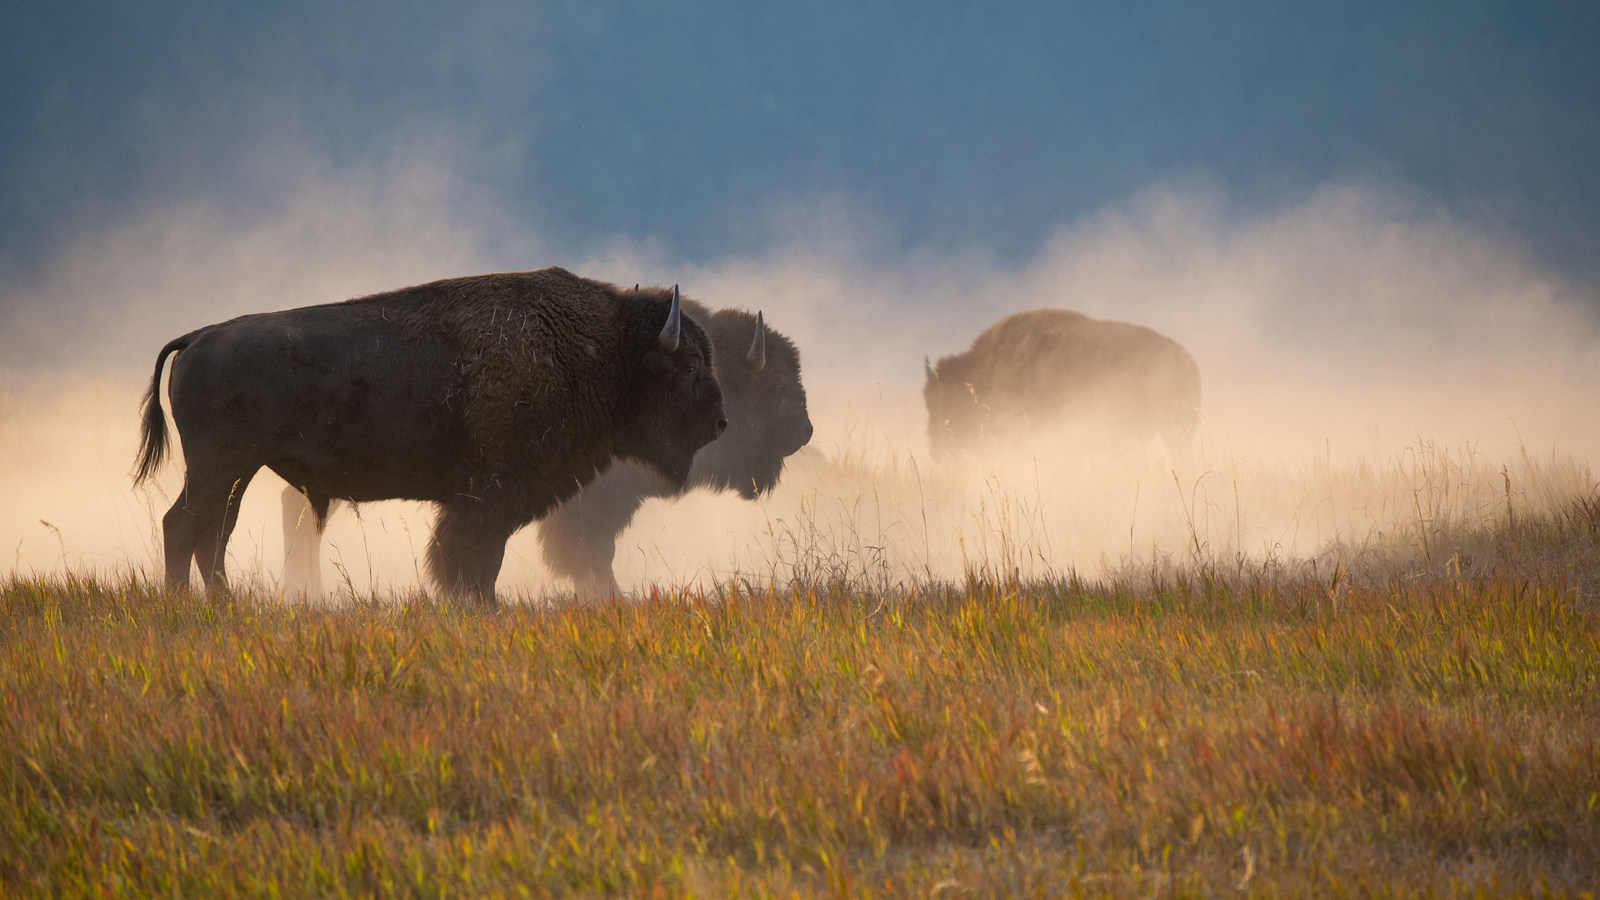
In the next image, the backlit grass seems to radiate from within. The dust adds drama and highlights the form of the bison (Grand Teton NP).
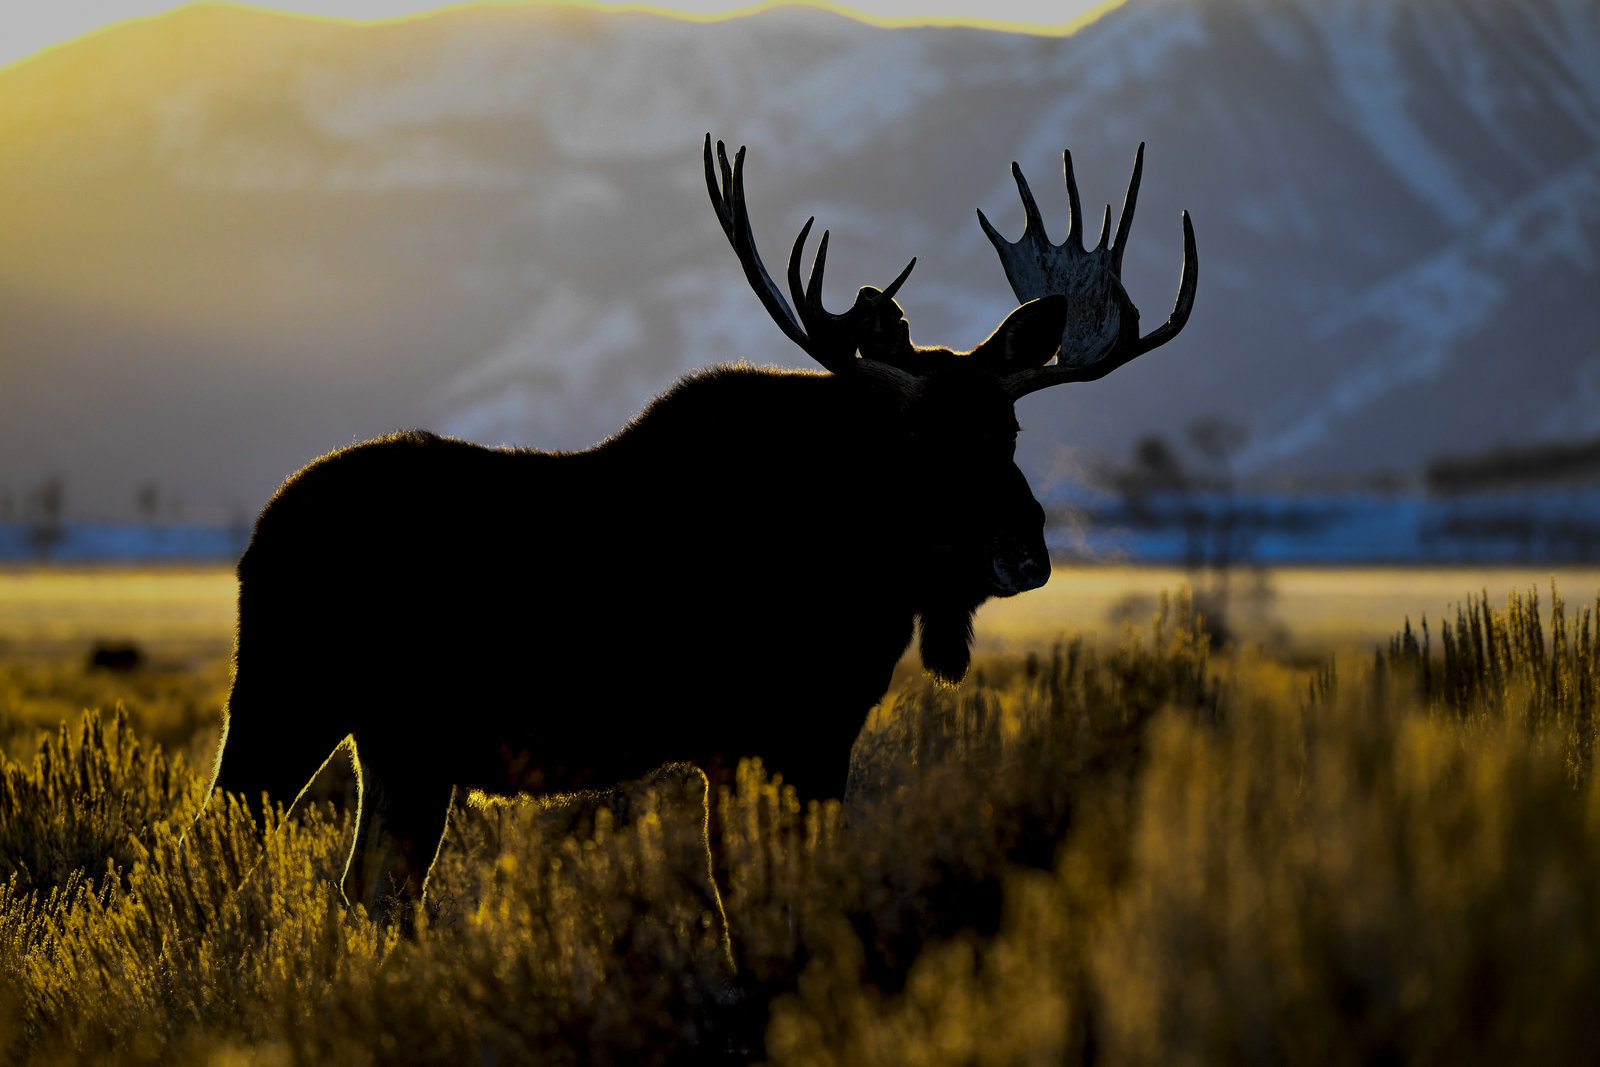
Backlighting can create a dramatic rim light on an animal and highlight their fur or feathers as we can see with the moose below. The backlit plants in this image also add drama to the scene. On this cold morning, the moose’s breath is also backlit. (Grand Teton NP)
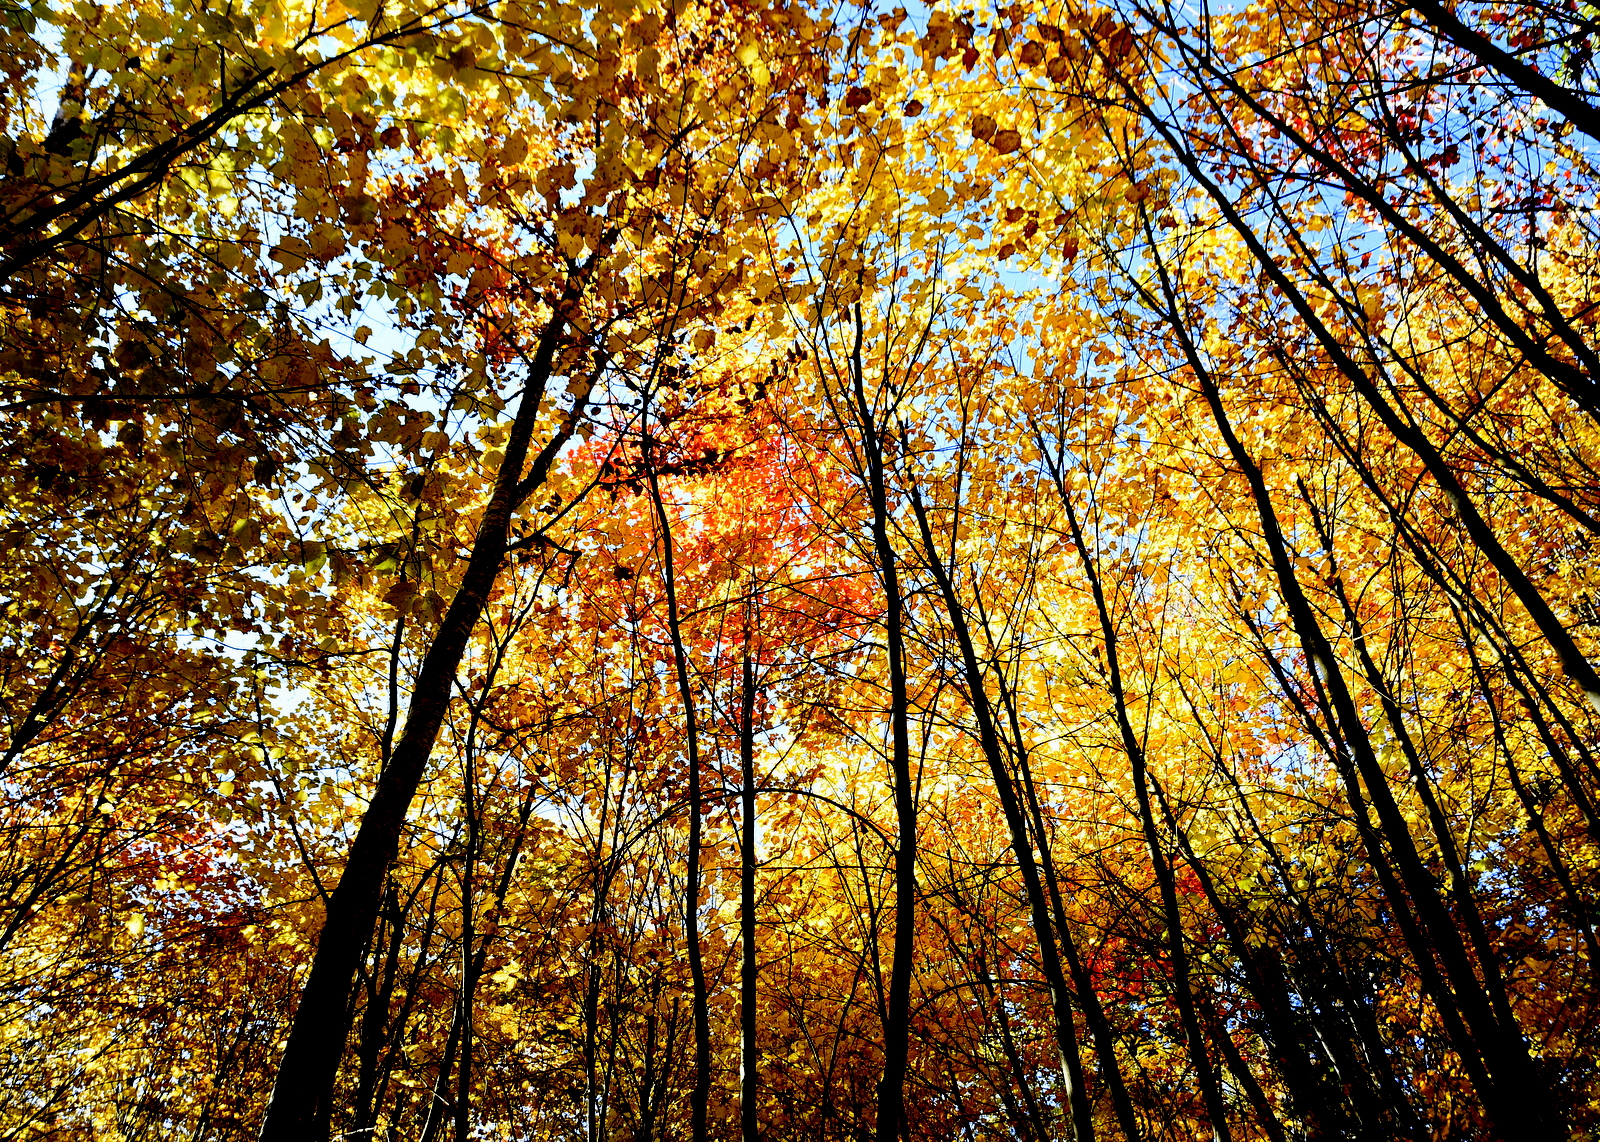
Leaves are a natural candidate for backlighting. Here we have a cathedral of color from these backlit Vermont trees:
Getting the exposure correct on a backlit subject can be tricky so you will definitely need to experiment with your settings to create the effect you are striving for. Despite the challenges, shooting into the light, with the sun behind your subject, is a great way to create dramatic images that stand out from the crowd and capture the beauty of nature in a, uh, well, different light.
Until next month…..michael
Here are some good articles on tackling backlighting:
Backlighting in Wildlife Photography: Creative Use of Light
Master backlighting with your wildlife images
Nikon D4S, Nikon 600 mm f/4, 1/8000 sec, ISO 640, EV -0.5
Mar
31
Shot of the Month – March 2022
")
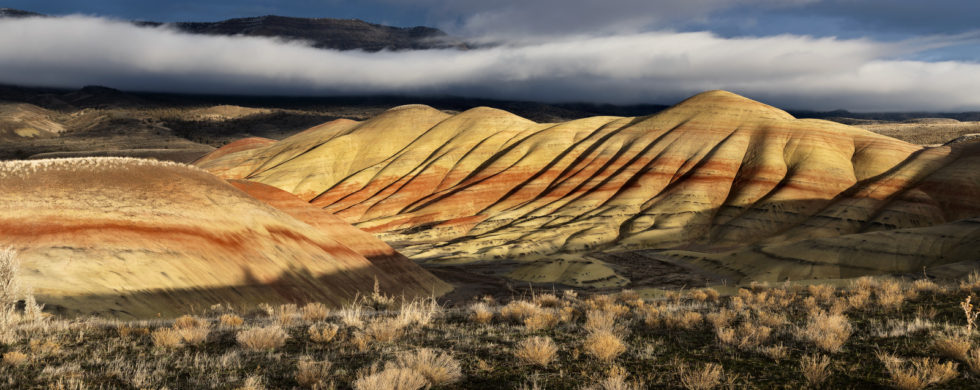
Travel to the high desert of Eastern Oregon and you can gaze in wonder at the Painted Hills as shown in the image above. These mellow, albeit colorful hills are a time capsule of a tumultuous past that is hard to fathom. Believe it or not, this place was once a tropical forest that was thick with vegetation, palm trees, bananas, and avocados. The area would get 80 inches of rain per year — this desert now only receives about 15 inches of moisture a year, mostly in the form of snow.
But I am getting ahead of myself. Let’s start at the beginning — waaaay back. This epic tale began 35 million years ago when massive volcano eruptions in the Cascade Mountains, a hundred miles to the west, blanketed this area with ash and pumice. Over time the ash and sediments were mixed by natural processes including the flow of water, growth of plants, and the movement of animals. The surface ash was oxidized over the passing eons. Buried under new layers and deposits, the ash turned into soils by way of compaction and cementation. With more time and weathering, the exterior surfaces of The Painted Hills were worn into clay. Now, they are primarily made of hard claystone layers.
Over the millions of years since those first eruptions, the area has experienced wild shifts in climate. Millions of years ago this space was home to weather more like Costa Rica – the tropical forests I mentioned earlier. Over time the climate shifted again and the area became a grassland with oak and maple trees. Those stunning colorful red, yellow, and black stratifications in the hills above are a signpost of each different climate reality.
The red stripes are laterite soil that was formed by floodplain deposits when the area was warm and humid. The darker black soil is lignite which was vegetative matter that grew along the floodplain. The yellow soils were formed during dryer, cooler climates. With each new climate, the landscape dramatically changed bringing different types of vegetation, water levels, temperatures, and animal life. Areas near the Painted Hills are rich with fossils from plants and animals – one can find fossils of saber-toothed cats, early horses, camels, and rhinoceroses to name just a few.
Standing on this quiet overlook, it is hard to comprehend the scale and breadth of the cataclysmic changes this land has seen.
")
")
")
")
These hills strike me as a powerful reminder that when we meet a hill, or a person, what we see today does not tell their entire story – they may have had a past, and may have a future, that is wildly different from today’s snapshot. Likewise, we can only imagine what they may have endured, for better or worse, to reach their current state.
Until next month…
Sources
If you want to photograph the Painted Hills here are a few good guides:
Here is a great overview on visiting the Painted Hills: Painted Hills of Oregon: Everything You Need To Know
Another guide: Exploring Painted Hills, Oregon
Another good guide: A Stunning Guide to Oregon’s Painted Hills
Nikon D850, Nikon 24-120mm (@35mm), f/8, 1/90 sec, ISO 64
Feb
28
Shot of the Month – February 2022
If you have any nature photographer friends you may have heard them talk wistfully about the “Golden Hour.” It is that special time of day just after sunrise or just before sunset when the light takes on magical hues of red, orange, or yellow and has a certain softness that seems to gently caress whatever it falls upon. During “Magic Hour” the sun is low in the sky, only a few degrees from the horizon.
The lesser-known cousin of Golden Hour is Blue Hour. I kid you not – it really is a thing. To explain it I have to get a bit astronomical-like, so strap in. And, uh, bring along your protractor…
At its simplest, Blue Hour takes place during twilight. I have heard this term my whole life but what exactly does it mean??
Twilight is the time between day and night when there is light outside, but the sun is below the horizon. During this period the light we see does not come directly from the sun but rather is scattered and refracted from the upper atmosphere down to our eyes.
Now for the more complicated version. Time to break out those protractors (And see, you thought that box in your attic from 3rd grade wouldn’t come in handy. Tsk. Tsk.)
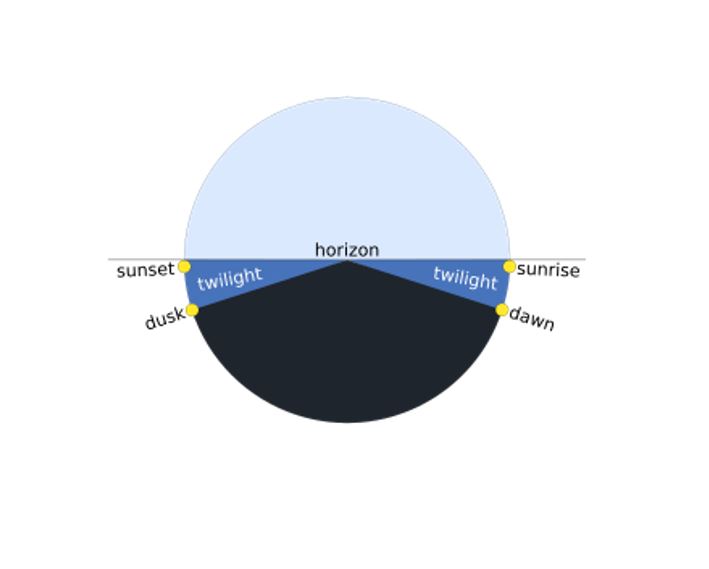
Astronomers were not satisfied with just one “twilight” and created a more precise delineation as shown here:
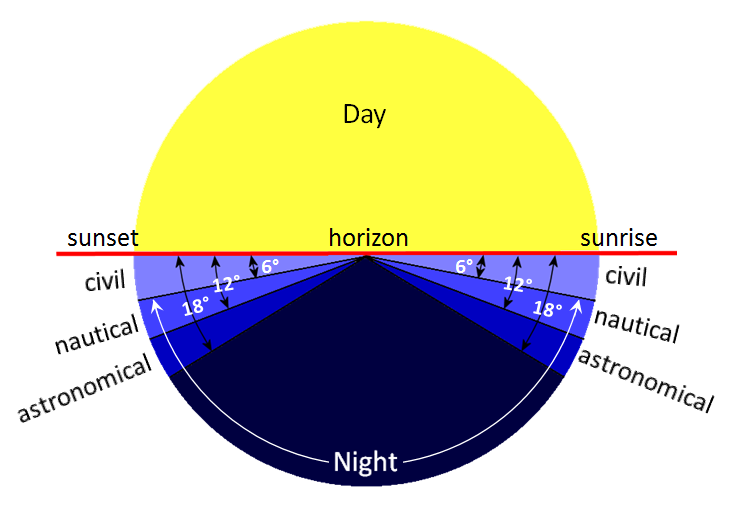
Let’s break it down.
Astronomical Twilight: The sun is located 12 to 18 degrees below the horizon. In astronomical twilight, sky illumination is so faint that most casual observers would regard the sky as fully dark, especially under urban or suburban light pollution. During astronomical twilight, the horizon is not discernible, and moderately faint stars or planets can be observed with the naked eye under a non-light-polluted sky. In the evening, when the sun is at 18 degrees below the horizon we have Dusk, the end of twilight, and the beginning of full evening darkness. In the morning, when the sun is 18 degrees below the horizon, we have Dawn, marking the end of full darkness as we begin the morning twilight.
Nautical Twilight: The sun is 6 to 12 degrees below the horizon. In general, the term nautical twilight refers to sailors being able to take reliable readings via well-known stars because the horizon is still visible, even under moonless conditions.
Civil Twilight: The sun is located less than 6 degrees below the horizon. Civil twilight is the period when enough natural light remains that artificial light is not (usually) needed.
Still with me? You are probably thinking – “Ok Galileo, this is all mildly (barely) interesting, but where the heck does Blue Hour fit in all this?”
Here ya go:
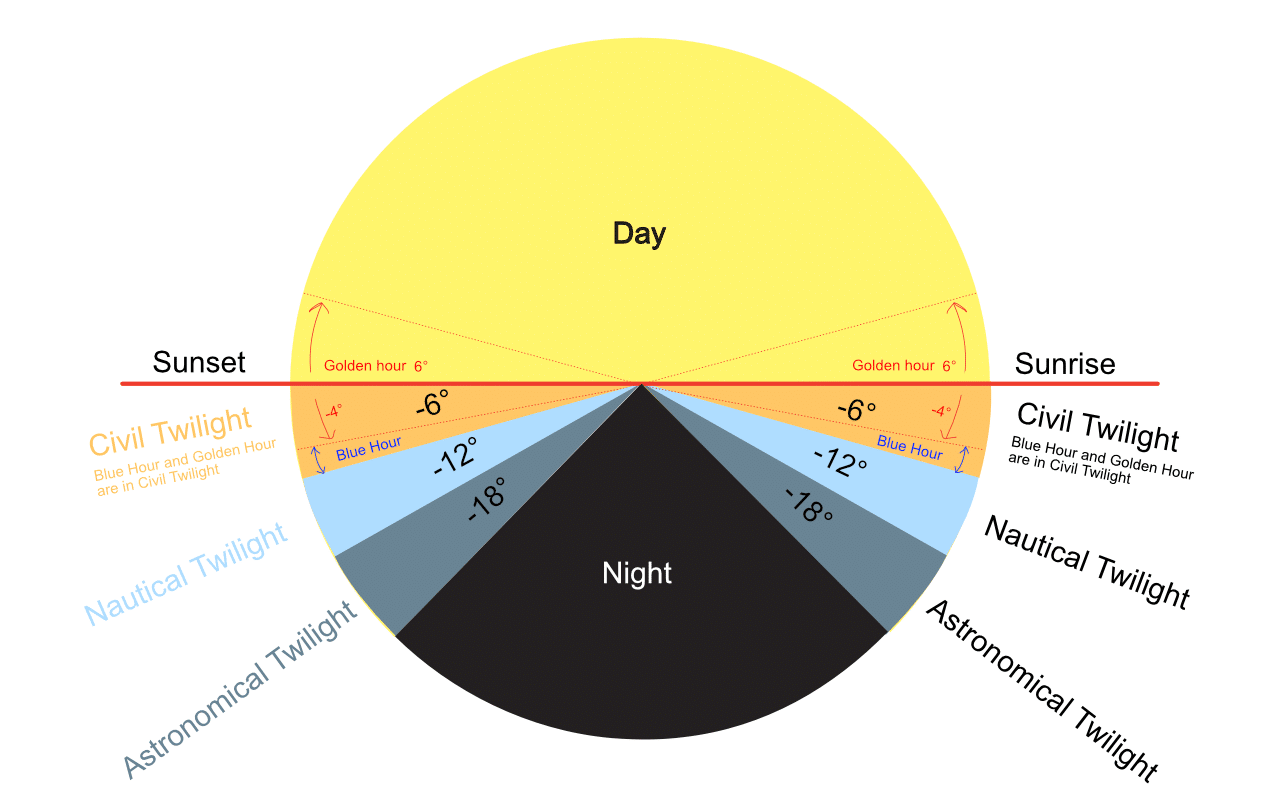
Blue Hour takes place when the sun is between 4 to 6 degrees below the horizon which is usually about 30-40 minutes after sunset/before sunrise. During this period the light takes on deep shades of blue and can produce unique images. Truth be told the Blue Hour really only lasts about 20 minutes but the duration varies by where you are on the planet.
I like this graphic also (some may find this one clearer):
(Did you notice “Gloaming” in the graphic above? It is just an Old English/Scottish term for twilight)
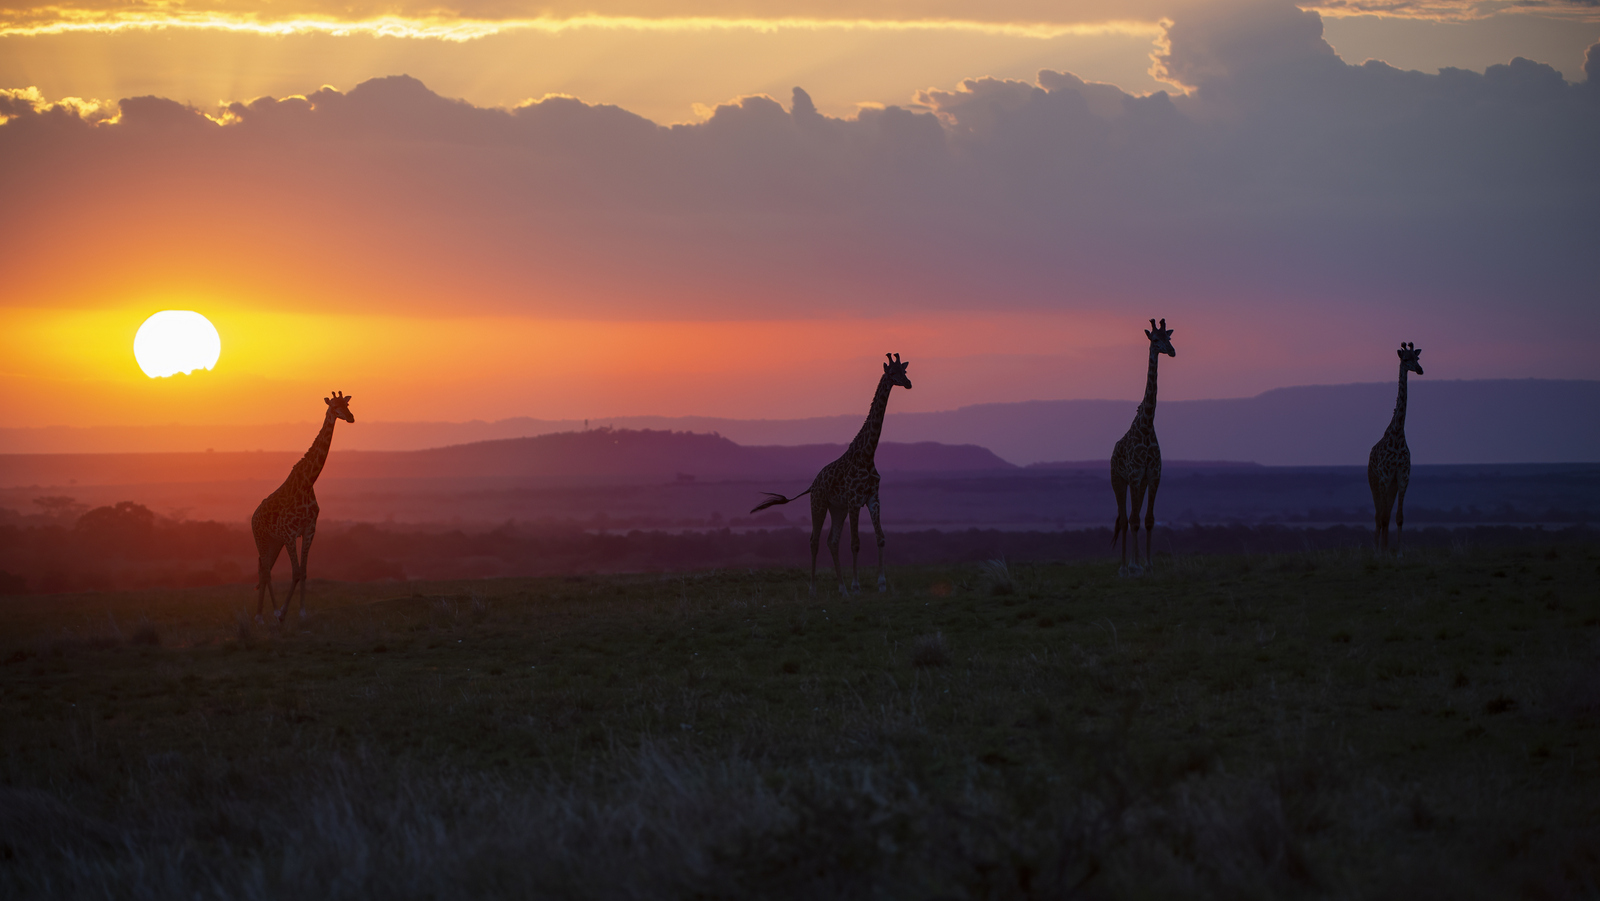
So that was a lot of blah blah to talk about the Blue Hour — more importantly, here is some of the magic it can work:
")
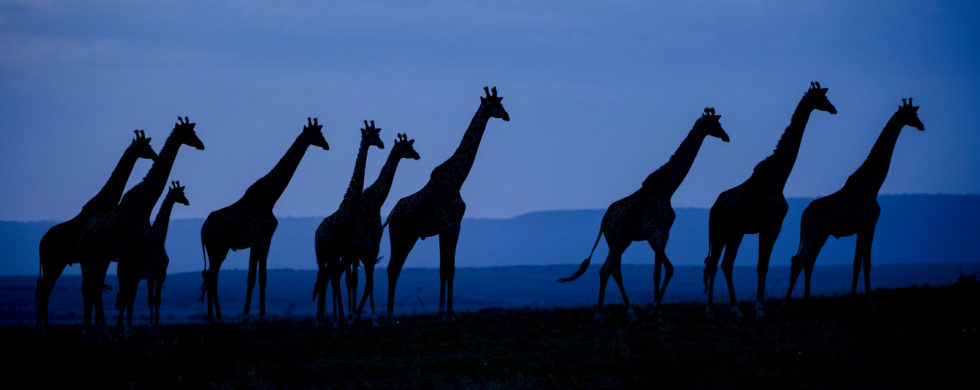
In this image we have a herd of giraffes strolling by shortly after the sun has set on the Serengeti plains of Africa (Masia Mara National Reserve in Kenya, to be precise).
Here is what the scene looked like while the sun was still above the horizon (late golden hour):
So, if you want to get your blue on you have to get out there waay early or stick around waay late, and then you have to work fast because blue time flies especially fast.
Now, don’t be blue, but we have reached the twilight of this post.
Until next month…..michael
Sources:
Mr. Reid.org (dawn-dusk-sunrise-sunset-and twilight)
Nikon D4S, Nikon 200-400mm, f/4, 1/400 sec, ISO 2000, -0.5 EV
Jan
31
Shot of the Month – January 2022
")
Many photographers love to “fill the frame” when they photograph wildlife. Many spend a tremendous amount of time, energy, and money to have the skills, equipment, and opportunities (photo tours) to allow them to get close to wildlife and capture an image that is filled from top-to-bottom, side-to-side with that fuzzy/furry/scaly natural wonder. Photographers will spend thousands of dollars for the largest lenses to give them the extra reach to magnify their subject.
Yep, all sounds pretty familiar – you can lock me up for this also – guilty as charged.
Our offense is understandable – we love wildlife and such images allow us to see details that one can rarely see with the naked eye. Such close-ups allow us to revel in the beauty of our subjects.
The downside is that you can go online and find thousands, and then many more thousands of images that look more or less the same.
To avoid this common mistake and get beyond the simple “animal portrait” when shooting I push myself to try and get at least 3 shots with different levels of zoom on the subject. And if I have even more time I rotate the camera 90 degrees and take another 3 shots with different levels of magnification. This can be achieved by either moving yourself (those boots were meant for walkin) or by using a zoom lens that can change focal length.

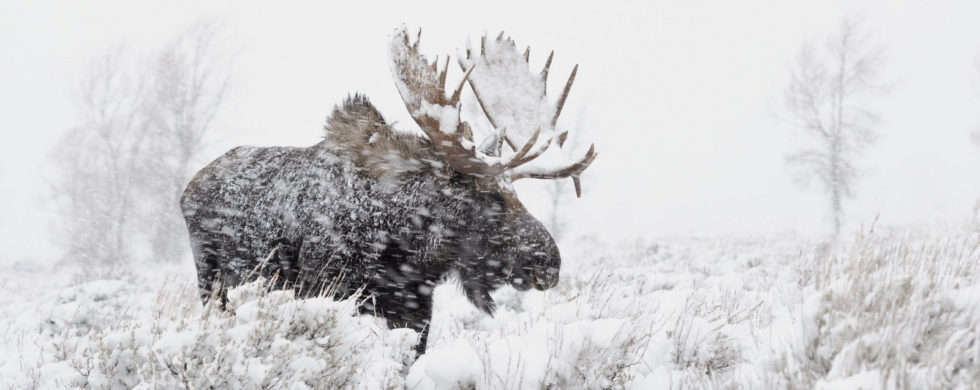
By pulling back I can place the animal in its environment or habitat and tell a more complete story about its life. For example, in the image above I purposely did not zoom in to allow the viewer to see this brutal, albeit beautiful, winter landscape, because it is as important to the story as is the moose. The wider view gives a sense of what life is like for a moose in the winter in the Grand Teton National Park (GTNP) in Wyoming.
Looking at that scene I can’t help but get a shiver down my spine.
Here is another one of my favorite images – by pulling back we see not only a magnificent bull moose but we also get to revel in the colorful bounty of fall in the GTNP.
")
I rarely share images of moose without antlers (cows, young males, post-rut males) as they usually are not as photographically interesting. In the image below however, the landscape adds so much to the story it becomes a keeper.
So, don’t get me wrong, I love me a great close-up portrait. My point is ok, once you get that shot, now keep going and explore what other stories can be told. The “environmental portrait” is a wonderful way to broaden and deepen the story and connect the viewer to not only the animal but also to the place they call home.
Until next month….m
Nikon D5, Nikon 70-200 mm f/2.8 (@105 mm), f/5.6, 1/180 sec, ISO 140, EV +1.0
Dec
31
Shot of the Month – December 2021

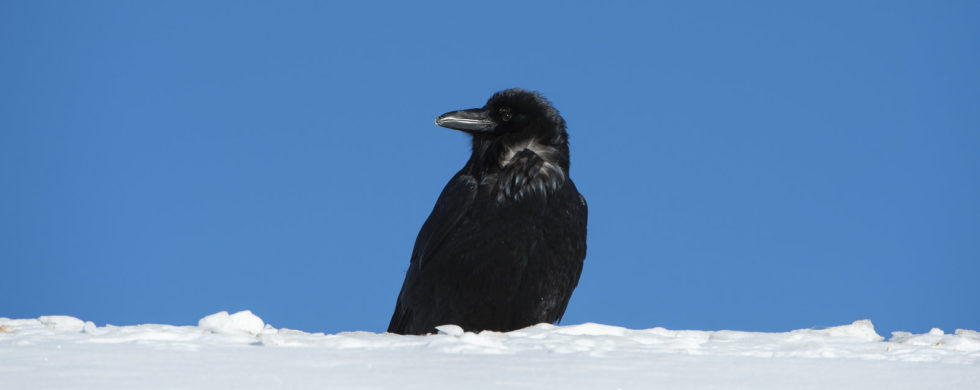
Capturing a good image of an all black bird is quite tough. Exposing properly to bring out the detail in the black feathers usually leaves the rest of the image overexposed. This image of a crow, captured in Wyoming, is one of the few times the lighting worked out.
I love the simplicity of the composition and the basic “primary” colors in this scene — simple but bold blue, black, and white. Of course these are not true primary colors – as we know from elementary school the three primary colors are red, yellow, and blue. But I think you get my drift.
I have to also note that I am only about 90% confident that this is a crow, which is a member of the Corvidae family. Also in this family is the Raven which looks very similar though ravens are usually larger, sound a bit different, and have a few other different physical traits. Here is a good video that highlights the key differences and clues on how to identify a Crow from a Raven.
Given the shorter, even-shaped bill, I am going with crow for my image.
As you may have heard, crows are incredibly intelligent and one of the few animals able to use tools. Watch the video below, it is one of my all-time favorites as it clearly demonstrates the mind- boggling problem-solving skills of crows.
There you have it – a bright image of a very bright bird.
Until next month….
Nikon D4S, Nikon 200-400mm (@400mm), f/8, 1/1500 sec, ISO 400, -0.667 EV
Nov
30
Shot of the Month – November 2021
 - Vermont")
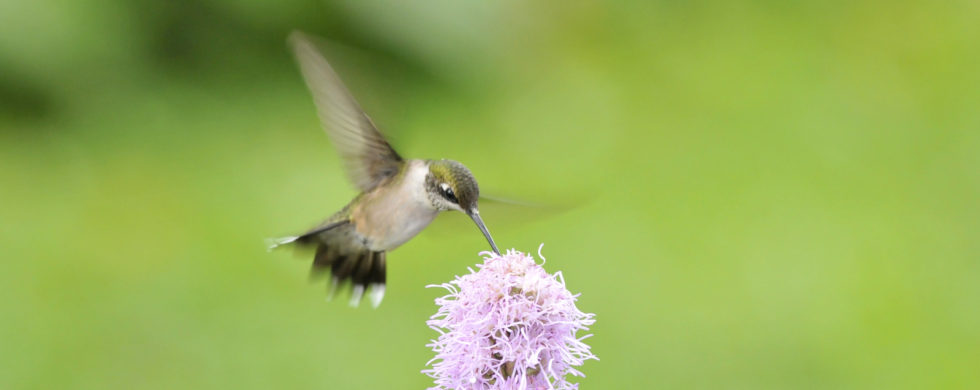
This month a dash of color to help counter the winter doldrums – here we see a lovely female Ruby-throated Hummingbird investigating the flowering Liatris Spicata (Blazing Star) plant.
You will notice that the wings off the hummingbird are blurred in my images. I actually like this look as it acurately reflects how we see hummingbirds with our eyes. And it adds to the “fairy” look – And what is more fairy-esque than these wee flying wonders?
 - Vermont")
Hummingbirds are tremendous flyers and can fly horizontally, backwards, vertically and can hover – the smaller the hummingbird the faster the wing beat to keep them aloft. The Ruby-throated humming bird shown here beats her wings about 50 times each second. A rufous humminbird’s wing beat is about 52-62 wingbeats per second. The giant hummingbird of the Andes (about the size of a Cardinal!!) has a wingbeat of just 12 beats/second. The tiny bee hummingbird of Cuba, the smallest bird on earth at just two inches in length, beats its wings 80 times per second. (Source)
Capturing an image of a hummingbird with the wings motionless is possible but requires a very fast shutter speed or the use of one or more flashes. Some photographers are quite adament about taking images of hummingbirds with the wings motionless and will go so far as to create mini “studios” to make it possible. In these setups one puts a feeder on a table or hangs it from a stand, sometimes amongst or behind flowers. From here you surround the area with 4 to 5 flashes set to expose the scene so quickly that the wing motion appears static. Sometimes a painted backdrop is added to ensure that the background color is just right. Quite a bit of tinkering may be needed to deterime the proper location of each flash to ensure that the scene is properly lit. You also need to spend some time to dial in the appropriate power output of each flash to get the right exposure. The feeder is essential to ensure that the hummingbird comes back to the exact same location for the specific lighting setup that you have created. Here is an example of one home setup:

In countries where hummingbirds are plentyful, say Costa Rica or Ecuador, you can actually book a photo tour where the guides will create elaborate hummingbird setups – all you have to do is show up, connect your camera to the flashes and snap away.
It’s all a bit much for me – I am not quite that motivated to get the “perfect” shot of a hummingbird and prefer to take my chances in the “wild.” In the images above I actually did use one flash but as you can see it didn’t do much to help stop the wing movement (I didn’t really know what I was doing).
Here we have a free range Anna’s Hummingbird that I shot with natural light in our garden:
 - Washington")
But hey, who I am to judge? If you are passionate about hummingbird flash photography, go for it. If you want more information on how to set up such a setup, look here:
Hummingbird Flash Set-up Guide
And here is a video of a guy that walks you through how he puts together his setup.
And here is an example of a hummingbird photo tour to Ecuador.
There you go – the ins and outs of hummingbird photography. You can go hardcore studio lighting or you can just “wing” it, uh, so to speak.
Until next month…..m
Nikon 300S, Nikon 70-200mm f/2.8 (@ 200mm @ f/4), ISO 800 1/250 sec.

Oct
31
Shot of the Month – October 2021
") Any great image starts with great light. The best light for nature photography can be found when the sun is low in the sky so usually around sunrise or sunset. At those times the light is filled with wonderful warm hues that humans really dig. Common advice for beginning photographers is to position yourself such that your shadow is pointing toward the subject making it “Front Lit.” With the sun behind you the light will fall evenly on your subject and help avoid highlights or shadows that can complicate making a proper exposure. With the amazing technology in modern cameras it is almost impossible to get the exposure wrong on a front lit subject. So even in “Program” mode, where the camera makes all the exposure decisions for you, you are more than likely going to get a properly exposed image.
Any great image starts with great light. The best light for nature photography can be found when the sun is low in the sky so usually around sunrise or sunset. At those times the light is filled with wonderful warm hues that humans really dig. Common advice for beginning photographers is to position yourself such that your shadow is pointing toward the subject making it “Front Lit.” With the sun behind you the light will fall evenly on your subject and help avoid highlights or shadows that can complicate making a proper exposure. With the amazing technology in modern cameras it is almost impossible to get the exposure wrong on a front lit subject. So even in “Program” mode, where the camera makes all the exposure decisions for you, you are more than likely going to get a properly exposed image.
Which is not the same as getting a compelling image.
One critique of front-lit images is that they can be a bit flat and lack depth, especially for landscape images. So while shooting front-lit subjects helps deal with the challenges of exposure, a great image still needs strong composition and/or skilled use of contrast, color, leading lines, etc.
In the image above, late afternoon light is casting a wonderful warm glow on the giraffe. I purposely shot this image from below and waited for the giraffe to reach a point where he would stand tall above the horizon in sharp contrast to the dark, brooding sky in the background. The exposure was a no brainer but we worked pretty hard to find the right spot to wait for the elements of the composition to line up and elevate this front-lit shot to something a bit more special.
Generally you want to avoid shooting in the middle of the day as the front light at this time is harsh and will produce difficult shadows on your subject. Either go home for a rest until the light gets better or explore compositions that will work in black and white.
Outdoor Portrait Tip: Front lighting works well for portraits of family and friends though the bright light can be tough on your subjects. Two potential solutions:
- Once your subjects are in place, ask them to close their eyes. This will avoid burning out their retinas as you set up the shot. Once you are ready ask them to open their eyes and smile. Click. Lovely image with no squinting.
- Find some shade and have your subjects stand there. The even light will work well and no eye strain for your subjects.
When in doubt, use front lighting to get the shot. Once you have that shot, time to explore more dramatic light – back lighting and side lighting. These lighting situations are tougher to expose properly but when done right can provide stunning results.
We’ll shine light on those topics on another day (see what I did there?).
All the best…..michael
Nikon D5, Nikon 600mm, f/4, 1/1000 sec, ISO 100, EV -0.667
Sep
30
Shot of the Month – September 2021
, Masai Mara, Kenya (8582)")
Is this image Art? And if it is, does that make me an “Arrrteeest”?
Photography was invented in 1826 (almost 200 years ago) and since that time the “Is photography art?” debate has raged on. This may surprise you given that photography is generally accepted today as Art, but this is a fairly recent phenomenon. How recent? Most museums only began to collect and display photographs in the late 1970s and early 1980s. Did you know that there are seven traditional forms of art?
Me neither. Photography is not among that list (scroll to the end to see the original seven).
So what is art? The Cambridge Dictionary says:
the making or doing of something whose purpose is to bring pleasure to people through their enjoyment of what is beautiful and interesting, or things often made for this purpose, such as paintings, drawings, or sculptures
I do strive to bring people pleasure with my images so perhaps I am trying to be an artist. Painting and sculpture use essential elements and principles such as line, shape, form, texture, balance, asymmetric balance, color, size, depth, light, positive space, and negative space.
Hmmn, interesting. I also consider many of these elements when I raise the camera to my eye. In fact, on an outing I may spend hours waiting to get the right mix of these elements in place before taking a single image.
As a photographer I spend much of my time trying to showcase the work of the world’s greatest artist – Mother Nature. Each day she throws together a fabulous mix of flora and fauna draped in captivating colors and hues. Every day, across the planet she is producing one masterpiece after another.
If I do my job correctly and get all the technical stuff right — set the right aperture, dial in the shutter speed, and compose the image well then Mother Nature will do the rest and we get some beautiful images that hint at the wonders of the natural world.
The Merriam Webster dictionary defines art as:
the conscious use of skill and creative imagination especially in the production of aesthetic objects.
I can say that I am a better photographer than I was 30 years ago – even this old dog has acquired a") certain level of skill and creative vision to help capture Mother Nature at her best.
certain level of skill and creative vision to help capture Mother Nature at her best.
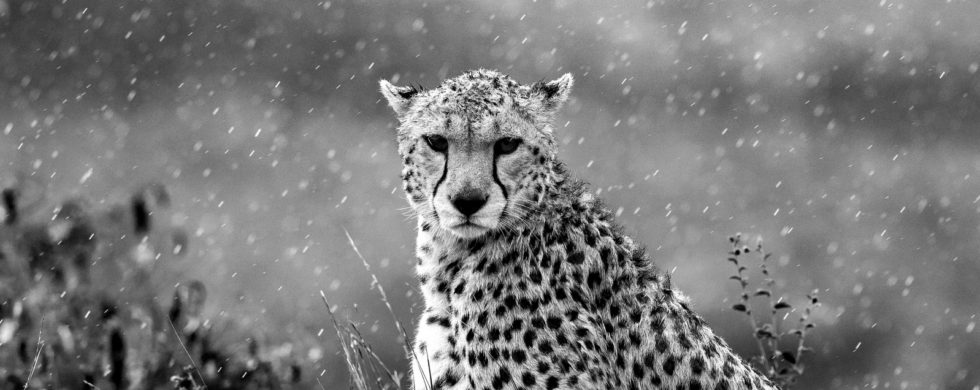
And some days I use a bit of “creative imagination” to manipulate an image to form something beyond what I witnessed. As in the photo above, converting it to black and white transforms a “mere” pretty picture of a cheetah into a portal that connects the viewer with feelings and mood a bit more universal.
In the color version we have a shared viewing experience as we all gaze outward at the beautiful scene. The B&W version may offer a more individual, internal journey and reaction that can have very little to do with a cheetah sitting in a driving rainstorm, on a continent far, far away.
The realistic color version connects us to nature, while the B&W version connects us to ourselves – perhaps reminding us of the storms that we weathered in our lives and how we persevered.
Wow, if I keep rambling like that I will have to get a turtleneck sweater, beret, and start smoking little French cigarettes.
Seems all a bit highfalutin for this small town boy (Art, Schmart). All I can say is, if you find joy, or a shared sense of awe, or brief respite from a troubled day with one of my photos, whether it be Art or something else, then I consider my time well spent.
Until next month….michael
Were you able to remember/guess the original, traditional forms of art? They are:
- Painting
- Sculpture
- Literature
- Architecture
- Cinema
- Music
- Theater
Sources
Is Photography Art? – Both sides of the debate explained.
What are the 7 different forms of Art?
A Brief History of Photography and the Camera
Nikon D5, Nikon 600mm f/4 (@f/5.6), 1/1000 sec, ISO 2500