Menu
Jul
31
Shot of the Month – July 2025
Last month we explored a non-traditional approach to Tulip photography using a “zoom effect.” This month, we will revisit a more traditional approach – subject isolation. You can read more about the use of subject isolation in this post:
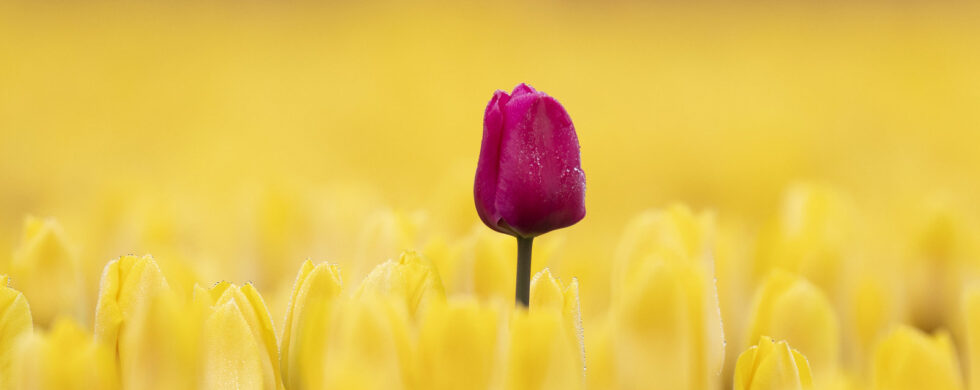
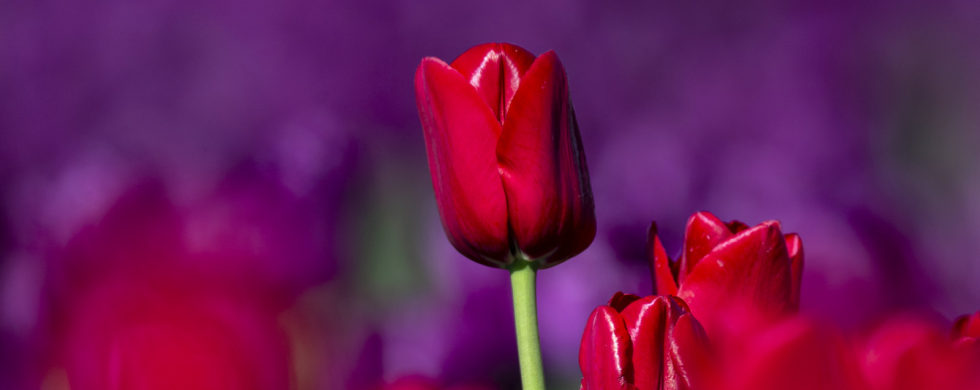
For tulip photography, we are looking for a composition that allows one flower to stand out amongst a field of so many. The image from that original post:
")
In the image above, I positioned myself to highlight the contrast between the flower and the background, allowing the subject to stand out clearly. A fairly shallow depth of field also helped isolate the flower.
In the next image, I used a shallow depth of field to blur the background with only the subject (flower) being in sharp detail to catch our eye.
")
In this shot I used both color and depth of field to isolate the yellow flower.
")
In the next image, I used the difference in color to highlight the yellow flower. The backlighting adds a nice dash of drama to the scene:
")
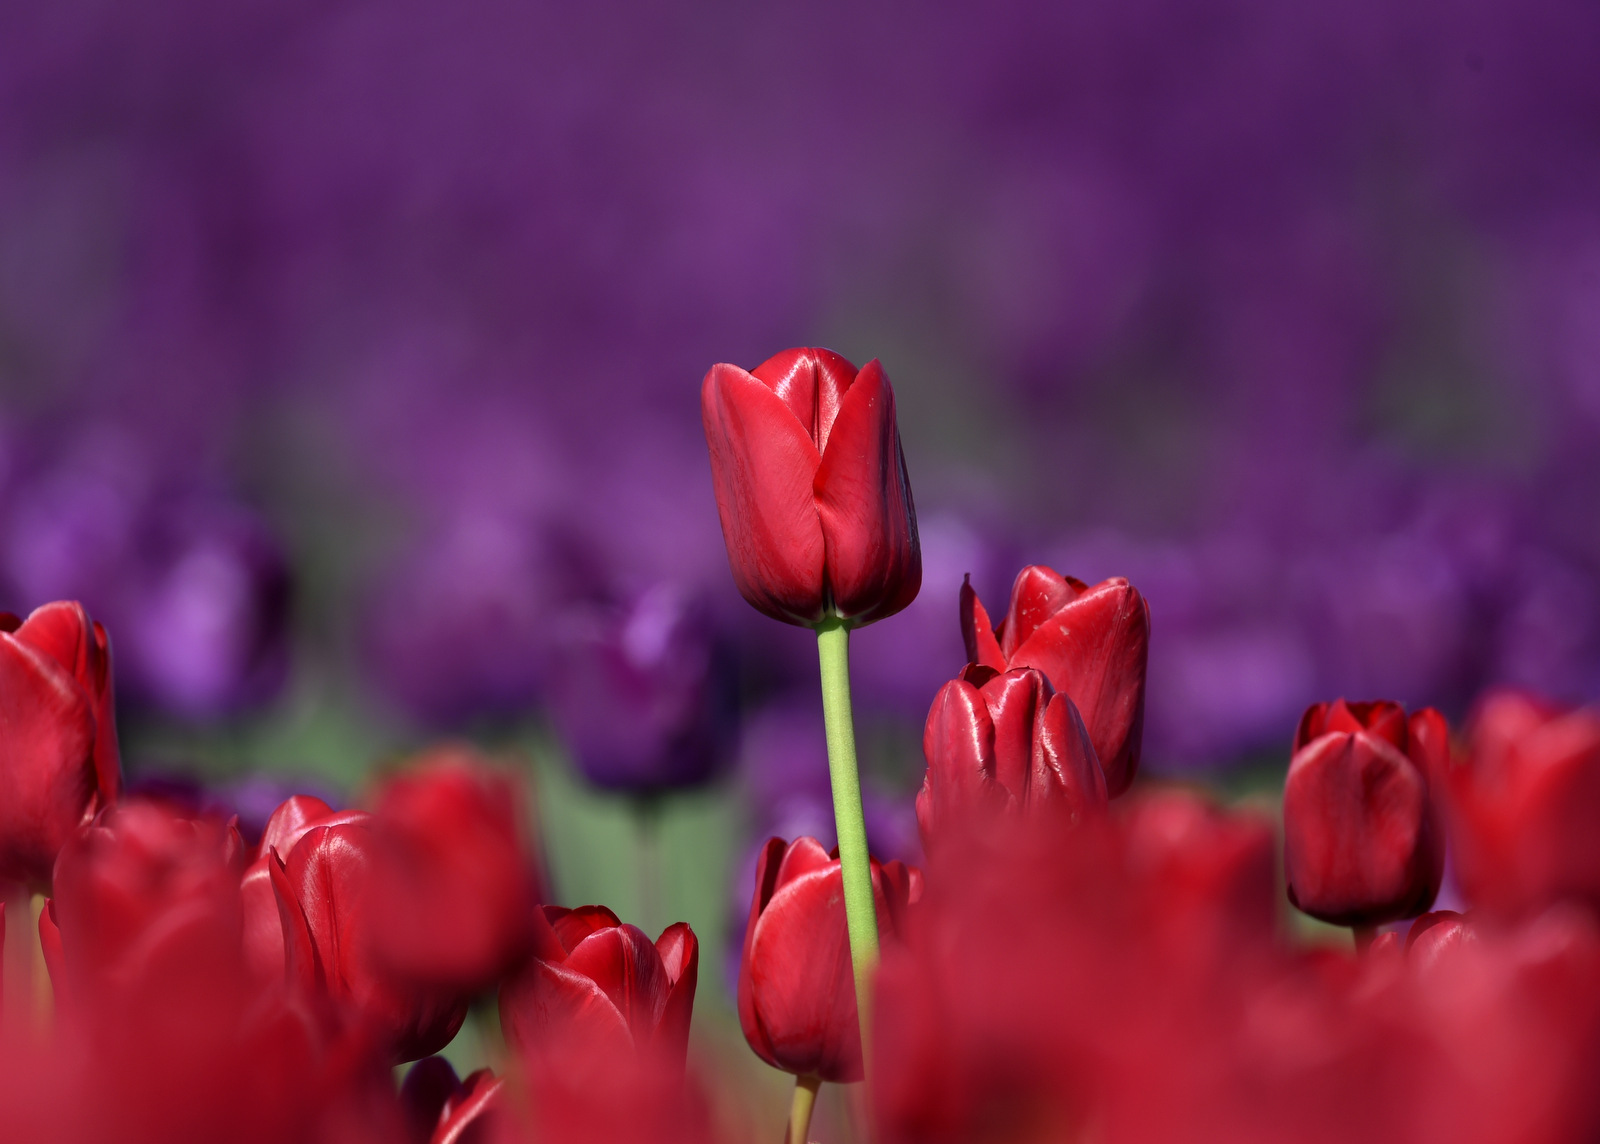
And for the next flower, we will explore how different compositions of the same scene offer a different feel:
Version 1:
")
Version 2:
")
Version 3:
")
And Version 4 in Landscape:
")
Have a favorite? And between versions 1 – 4, do you find that one appeals to you most?
In terms of visual impact, I love the vibrant colors and fun contrasts. And nonsensically, I find myself rooting for the lone flower standing bravely on her own. Another example of the wonders of art and how we apply our own meaning, stories, and sagas to an otherwise “neutral” scene.
Until next month…..michael
Nikon D500, Nikon 600mm, 1.4x TC, 1/640 sec, f/5.6, ISO 320
Oct
31
Shot of the Month – October 2024
")
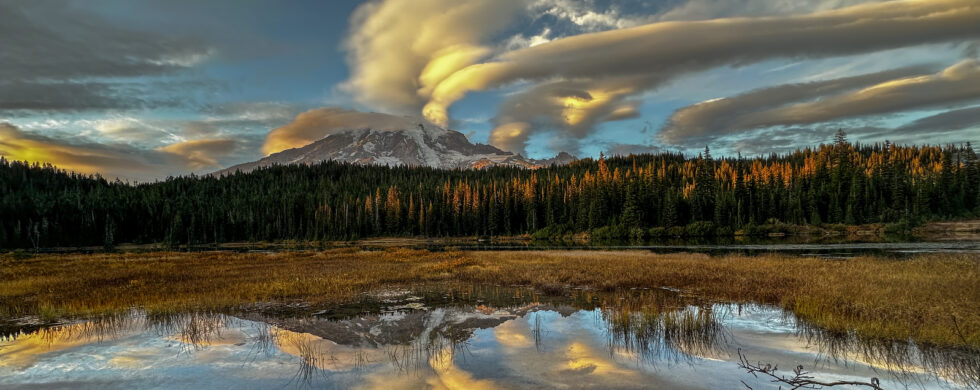
I stood by Reflection Lake in the late afternoon with low expectations. I have never had much luck getting a good shot of Mt. Rainier at this time of day – usually, too much wind to get a reflection and rarely any good clouds. I actually left my camera in the car figuring I would enjoy the scene like a normal person. But then I almost jumped out of my skin when the clouds suddenly rolled in and the low sun started to bask them in warm light. And the air was unusually calm allowing for a great reflection. I ran and got my gear and started shooting.
Click here for more on this photo hotspot:
Many non-photographers are surprised to learn how important clouds are to creating a compelling sunrise/sunset landscape image.
How important? Well, I know many a landscape photographer who will skip a potential shoot if there is a forecast for no clouds. Clouds are so important that there are apps to predict the timing, height, and density of clouds for a given location. Most serious landscape photographers have at least one or two of these apps on their phones and study them judiciously before heading out for a shoot. Some include Clear Outside, Astrospheric (IoS, Android), and Windy.com (IoS, Android).
There is no doubt that the sun sinking beneath the horizon on a cloudless night at the beach can be serene, beautiful, and romantic…. But it rarely makes for a compelling image. Clouds, when at the right height and density catch the sun’s glorious first or last rays of red, orange and yellows that humans love. Clouds create drama and make an image more visually striking.
For example, this is a nice sunrise shot I took at Swiftcurrent Lake in Glacier National Park:
")
But look at what clouds can add to the scene:
")
(Ok yes, I found a better/more compelling foreground in the second image, but you still get the idea. That sky is more dramatic and interesting)
In this sunset scene at the same location I had clouds but they were too dense to allow the colors to come through. My solution was to go for a very long exposure that allowed the motion of the clouds to add drama and visual interest to the scene.
")
Read more about the story in getting these shots at Swiftcurrent Lake here:
The shot below of a tulip field at sunrise had some real potential but in the end fails due to the lackluster sky. Nary a cloud….sigh.
")
In the image below at Rialto Beach the dramatic foreground and compelling silhouette make this a decent image but a few more clouds to catch some color would have taken it to another level:
")
See more on Rialto Beach here: Rialto Beach
And in this next shot of the Lime Kiln Lighthouse we have juuuust enough clouds to make it a usable image:
")
But if I crop the image, to allow the clouds to fill more of the scene, I find it more compelling:
, crop")
Click on the box to read more about how I got the shots at the Lime Kiln Lighthouse: Landscape to Lovers
As you can see, a cloudy day is not always a bad thing. And if you happen to be a landscape photographer, clouds are often essential to making our day into something special.
Until next month….michael
Jul
31
Shot of the Month – July 2023
")
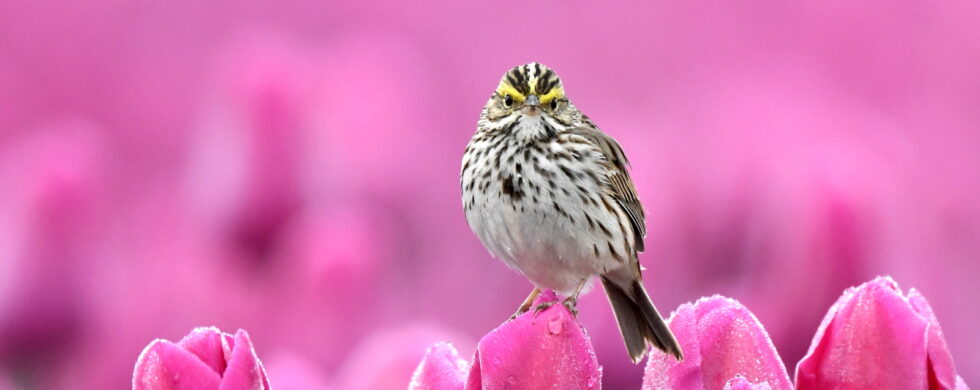
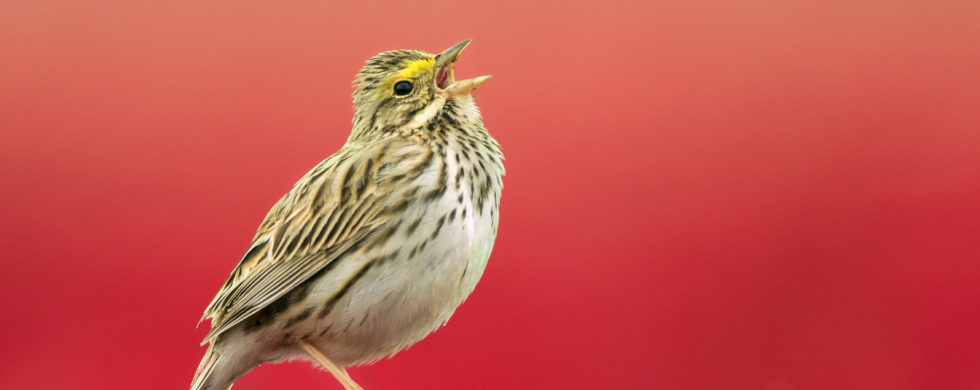
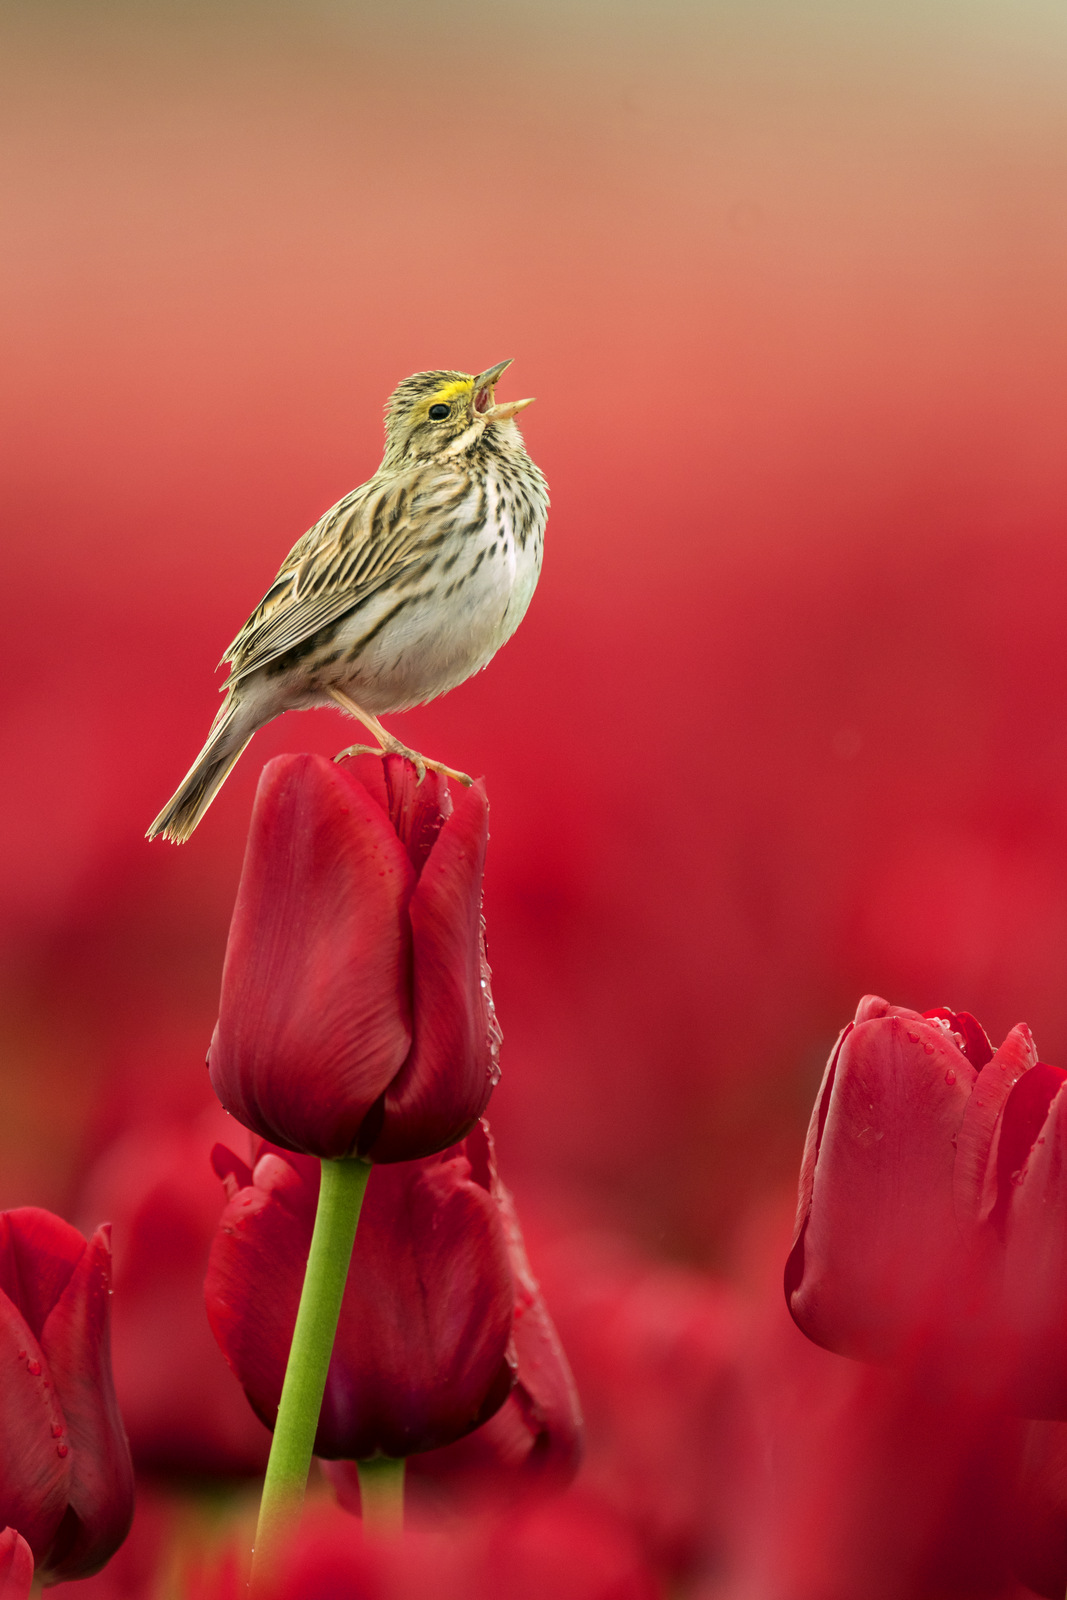
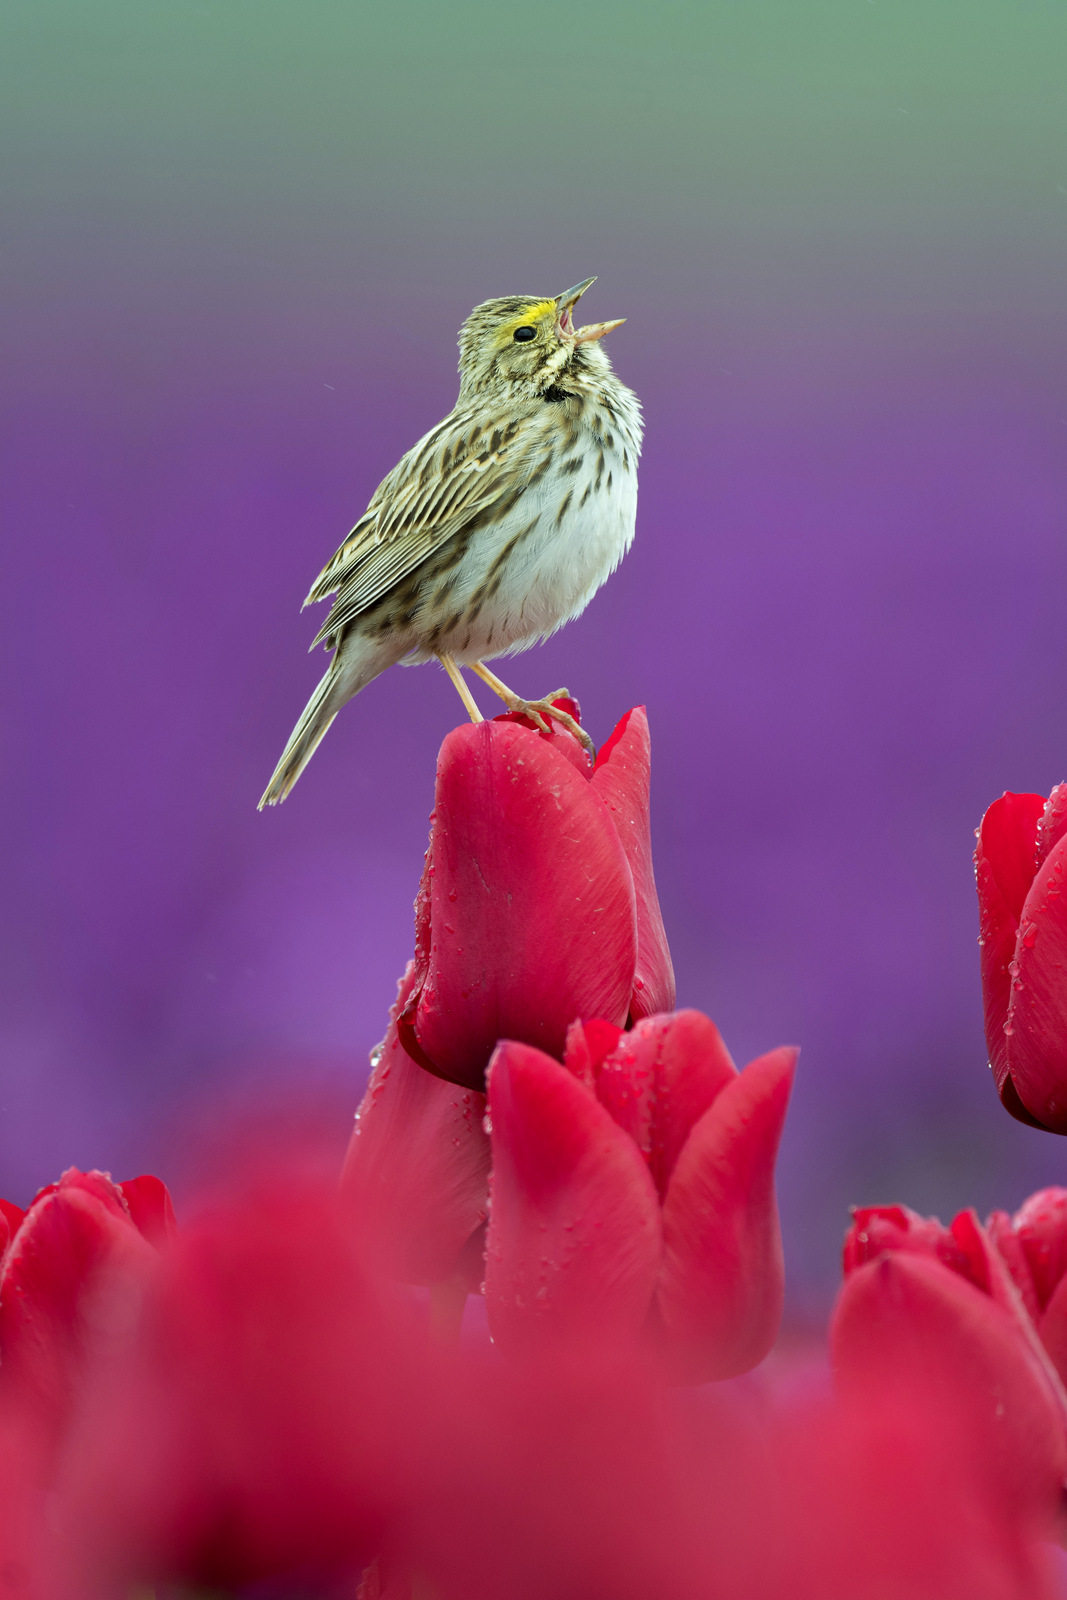
This month a fun blast of color from the tulip fields of Skagit County in Washington State. In this image I found a Savannah Sparrow guarding this fuchsia-colored field of tulips.
I shot this photo in portrait orientation as those long tulip stems were best highlighted and celebrated with a vertical composition. I also really enjoyed the different “zones” of this shot:
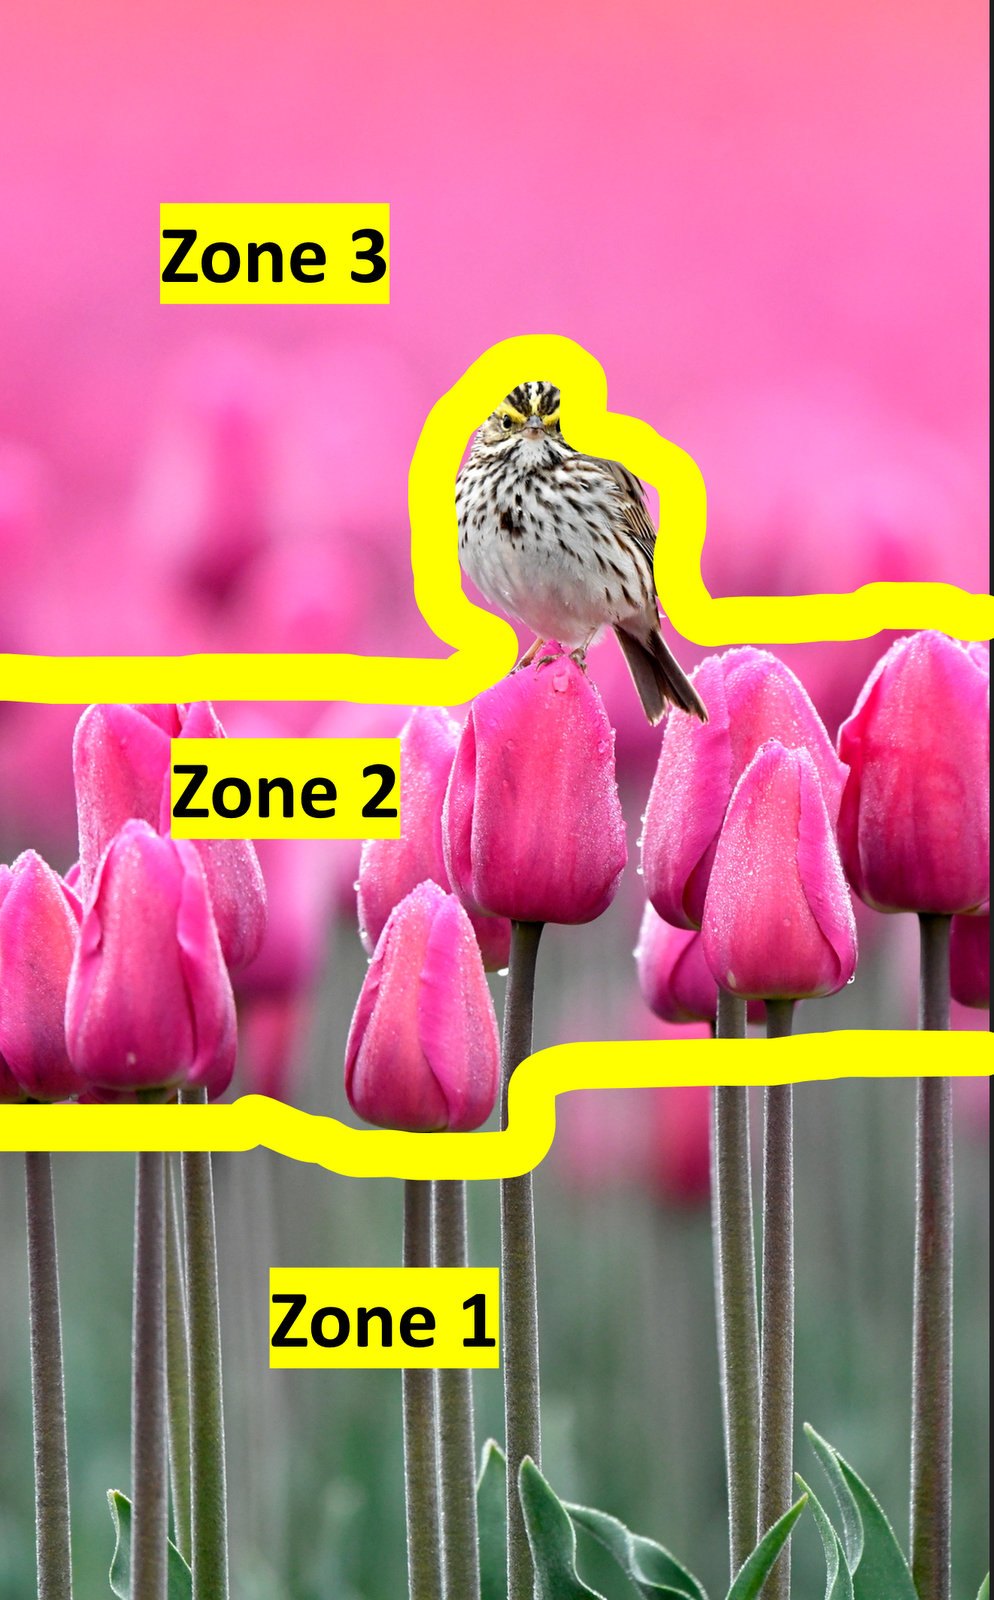
Zone 1: While the stems are in sharp focus (you can see the t-i-n-y hairs on the stems!) the background fades away into a pleasing out-of- focus green and your gaze can go on forever…
Zone 2: In this zone we have a dramatic shift in color and at this distance all of the flowers are in sharp focus. Likewise, our lovely Savannah Sparrow is nicely crisp as he poses for his portrait.
Zone 3: In zone 3 another dramatic shift in focus as the tulips vanish into a deep blur but the bold fuchsia hue still demands attention. The Savanah Sparrow really pops against that blurry background.
Another view from the Fuchsia Field:
")
Check out this post for more on my adventures photographing Savannah Sparrows among the tulip fields.
Until next month….m
Nikon D500, Nikon 600mm w/ 1.4x TC (1275mm effective), f/5.6, 1/640 sec, ISO 2500, +1.0 EV
Jun
30
Shot of the Month – June 2019
")
This month a photo of a tulip that demonstrates the power of isolating your subject to help create a compelling image. In this shot there is no doubt about what this photo is about — our eyes can’t help but be drawn to that lone red tulip in the center of the frame. In this image I used several techniques to isolate the subject:
Choice of depth of field
In this shot I used a very shallow depth of field (aperture of f/5.6) to ensure that almost all of the other flowers in this field were out of focus. Our eyes are naturally drawn to the part of the image that is in focus. For comparison look at the same image taken with a very wide depth of field (aperture of f/22). In this version  the field of flowers is more in focus and, at least for me, more distracting. I find that my eye jumps around more from one part of the photo to the next and weakens the visual impact. Click on the image to see it larger. Here is a primer on understanding depth of field.
Point of View (POV)
To get this image I shot while crouched on my knees to get a low angle — this allowed me to shoot up and through the red flowers in the foreground and create depth in the image. This POV also allowed the red tulip to appear higher into the field of purple in the background and helped create more separation and space between the subject (red) and the foreground (red). Don’t be afraid to move around and explore the scene to make sure you are including the elements you want in the shot, and perhaps even more importantly, explore how your POV can help remove elements that weaken your image. Try higher. Then lower. Move to the right. To the left….shake it all about….
Contrasting Color
I was immediately drawn to this scene by how the red tulip popped visually against that purple background. The lovely green stem of the subject also adds more contrast and leads the eye to the subject.
Centered Subject
Landscape orientation is not as compelling for this shot
While it is often not recommended to center your subject it can sometimes be a useful technique under the right circumstances (See my post here on this topic). I usually try multiple compositions with the subject to the left, right and centered to help find what works best for the scene. I also often shoot in both landscape and portrait orientation to see which leads to a stronger composition. Given the vertical nature of the flowers portrait orientation worked best.
Wow, so much to consider to just get a pretty picture of a flower! These are in fact just a few of the ways that one can isolate the subject of an image. What are the others? Hmmn, that sounds like fodder for a future post….I just need to get outside and get the shot….stay tuned.
Until next month…m
Apr
30
Shot of the Month – April 2018
Savannah in Red
With my third spring in Washington State approaching I finally had some time to explore a tulip festival that is held each year about an hour north of Seattle. Given that the “subject” of this photo shoot was going to be expansive fields of colorful tulips I packed up my wide angle lenses and a tripod and off I went, leaving my long lenses behind. Time to do some landscape photography.
On our first visit we drove from site to site to explore the different fields to try different compositions and identify the photographic possibilities. At one site I spotted a bird sitting on flower as you can see below. My heart suddenly raced with excitement. With my largest lens only going out to 200 mm my options were limited but I sensed the massive potential for something special — I would have to come back with the right gear and try for the shot that I could see in my mind’s eye.
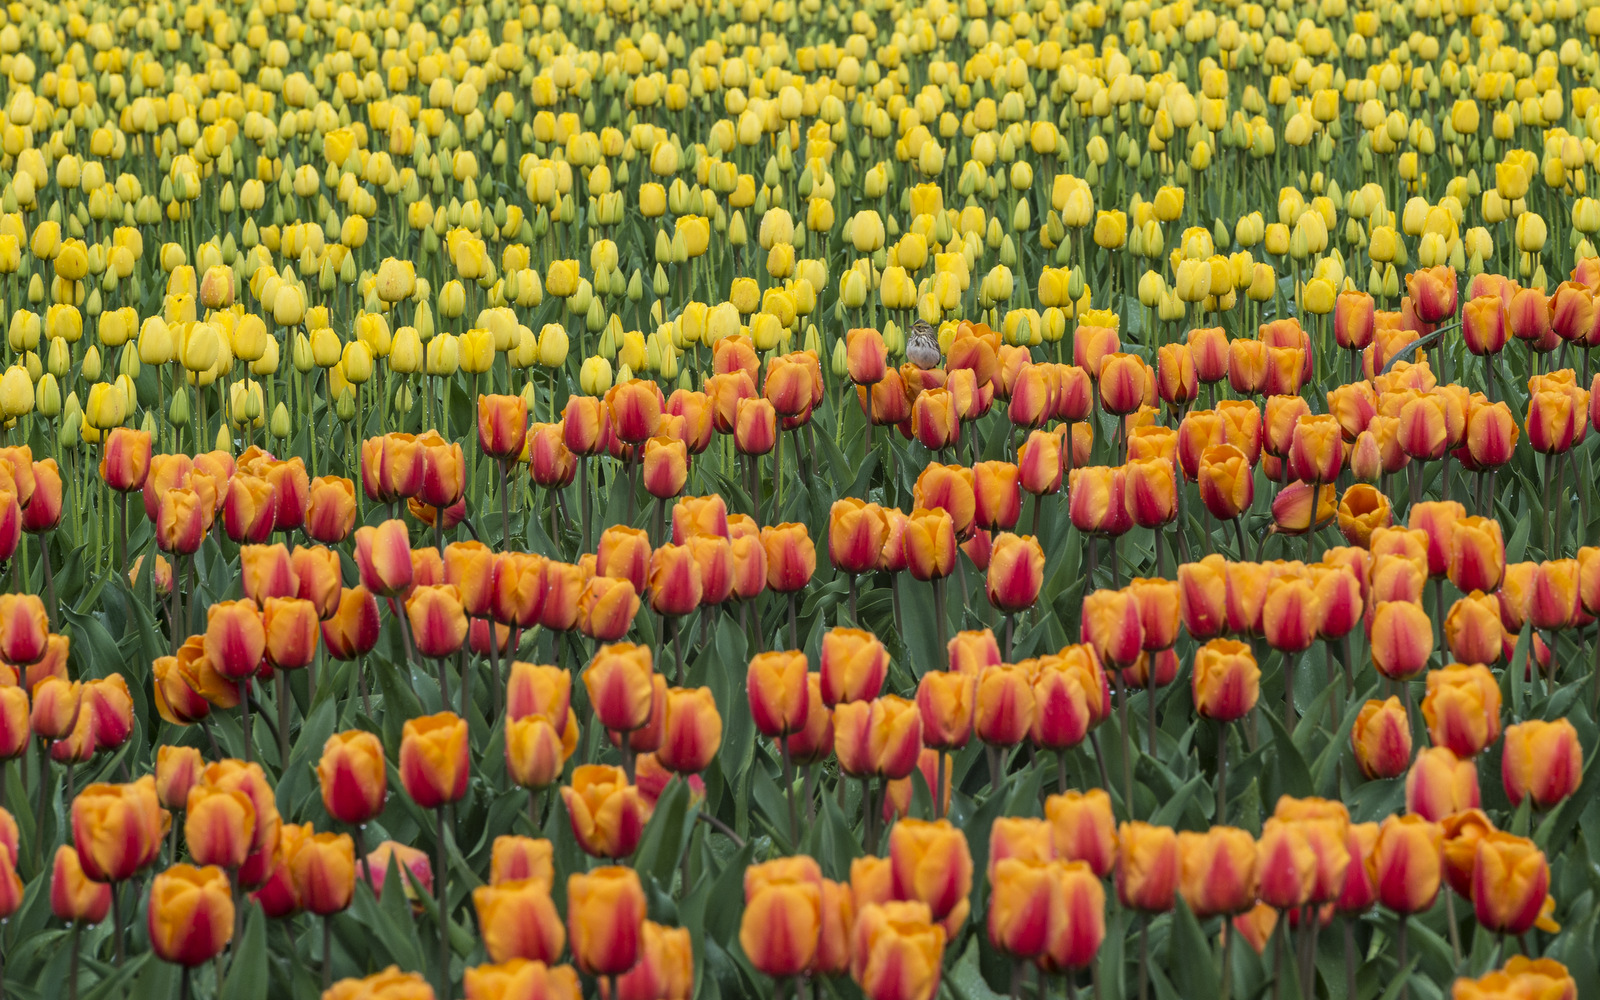
Inspiration for what could be…(yes, if you look closely, there is a bird in there)…
So, a few weeks later I returned, this time with my 600 mm lens and a monopod. I started the morning with more traditional landscape gear as I awaited the sunrise. I explored the scene at 24 mm until the sun was too high for that shot to work and it was time to bring out the long lens. For the next 4-5 hours I slowly walked among the rows of tulips looking for my quarry — a Savannah Sparrow (SS). The SS sparrow likes open terrain and typically feeds on the ground so the tulips fields were a perfect setting for him. After a few trips to the fields I began to understand the patterns — the birds would become more active by “mid” morning; by around 9:30 am the birds would begin to perch on the tulips and sing, proclaiming their territory. After a bit of time I could identify the circuit a bird would make as he traveled along the perimeter of his part of the field. I could even begin to identify his preferred tulips to sit upon. Of course, this would vary, but he often like to find the tallest tulip in an area to maximize the effect of his song.
I imagine that from the road that people were perplexed as to what that guy (me) was doing out in the fields with such a massive lens – “What in the hell is that guy shooting,” I assumed that many a visitor muttered to themselves. Some were even brave enough to ask. My reply was simply, “Just the birds.”
Each bird stayed in its territory so a given SS would only provide me the opportunity for one color of shot. The fellow above provided me with my “red” shot. To get the “purple” shot I would have to move to another section of the field and find a new bird, and learn his unique patrolling pattern. And from there I just looked for opportunities to mix and match as many colors as possible. Birds stopping along the edge of two adjacent, but different colored fields, provided opportunities for multi-colored scenes.
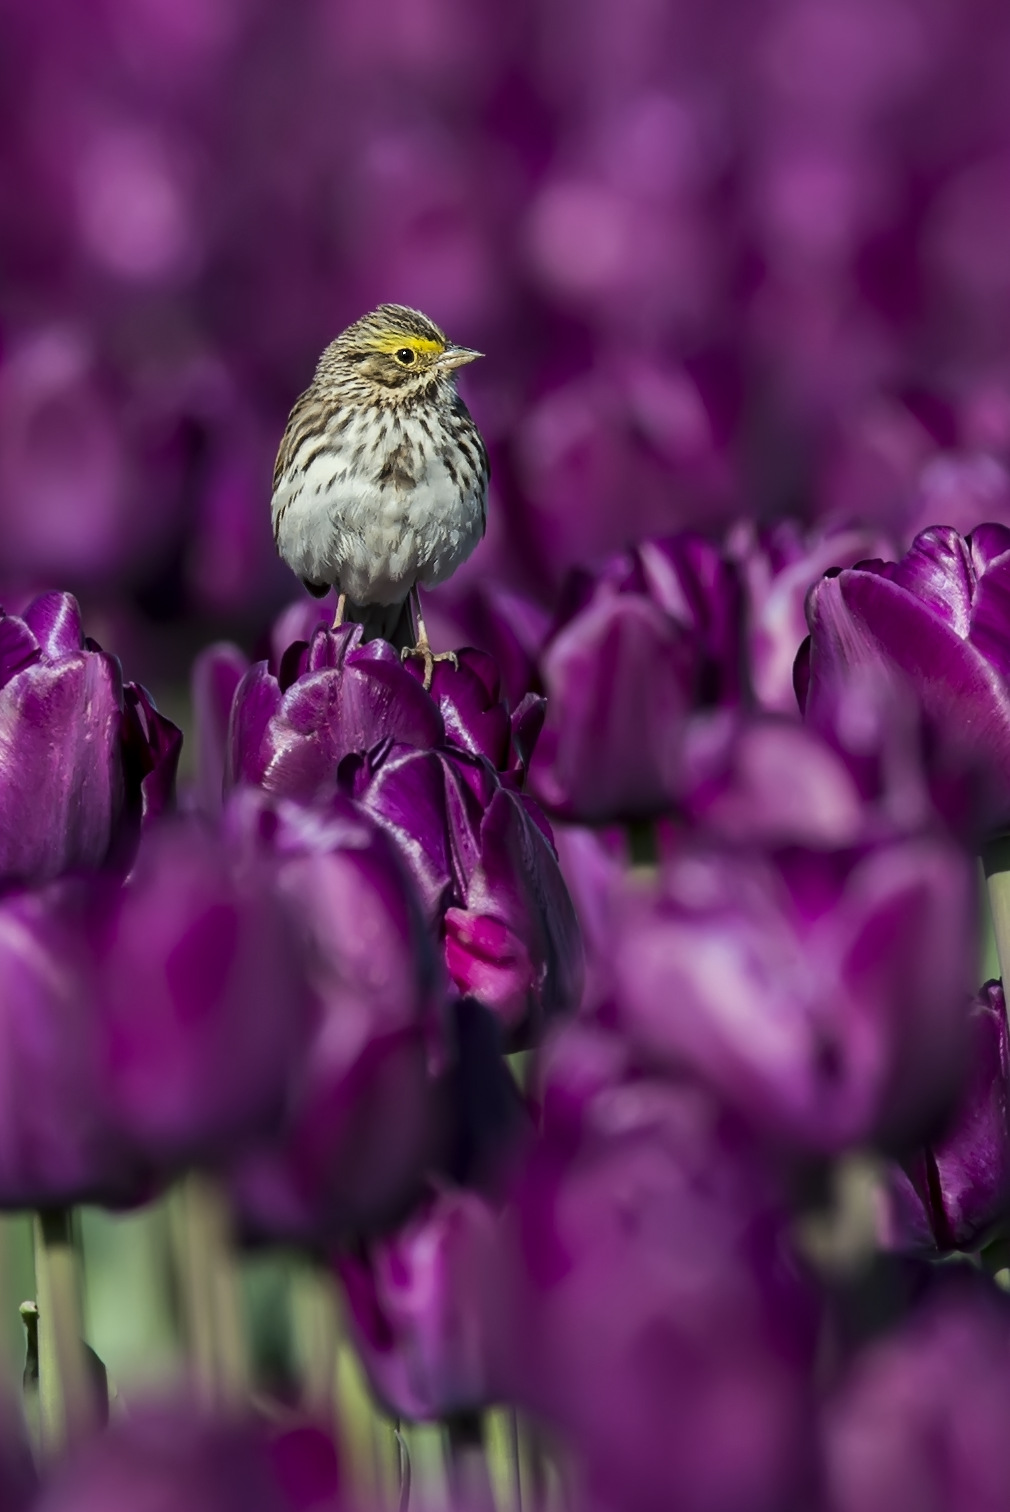
Savannah in Purple
Savannah in Red, Purple and a bit of Green
As I seem to have a knack for doing, I yet again managed to transform a typical landscape outing into a wildlife focused affair. In this case a tulip landscape morphed into a fanciful, magical perhaps, technocolor birdscape. So much fun…
Until next month…..m
Nikon D500, Nikon 600mm, 1.4x TC, (effective 1275mm), 1/1000s, f/5.6, +0.333 EV, ISO 400